
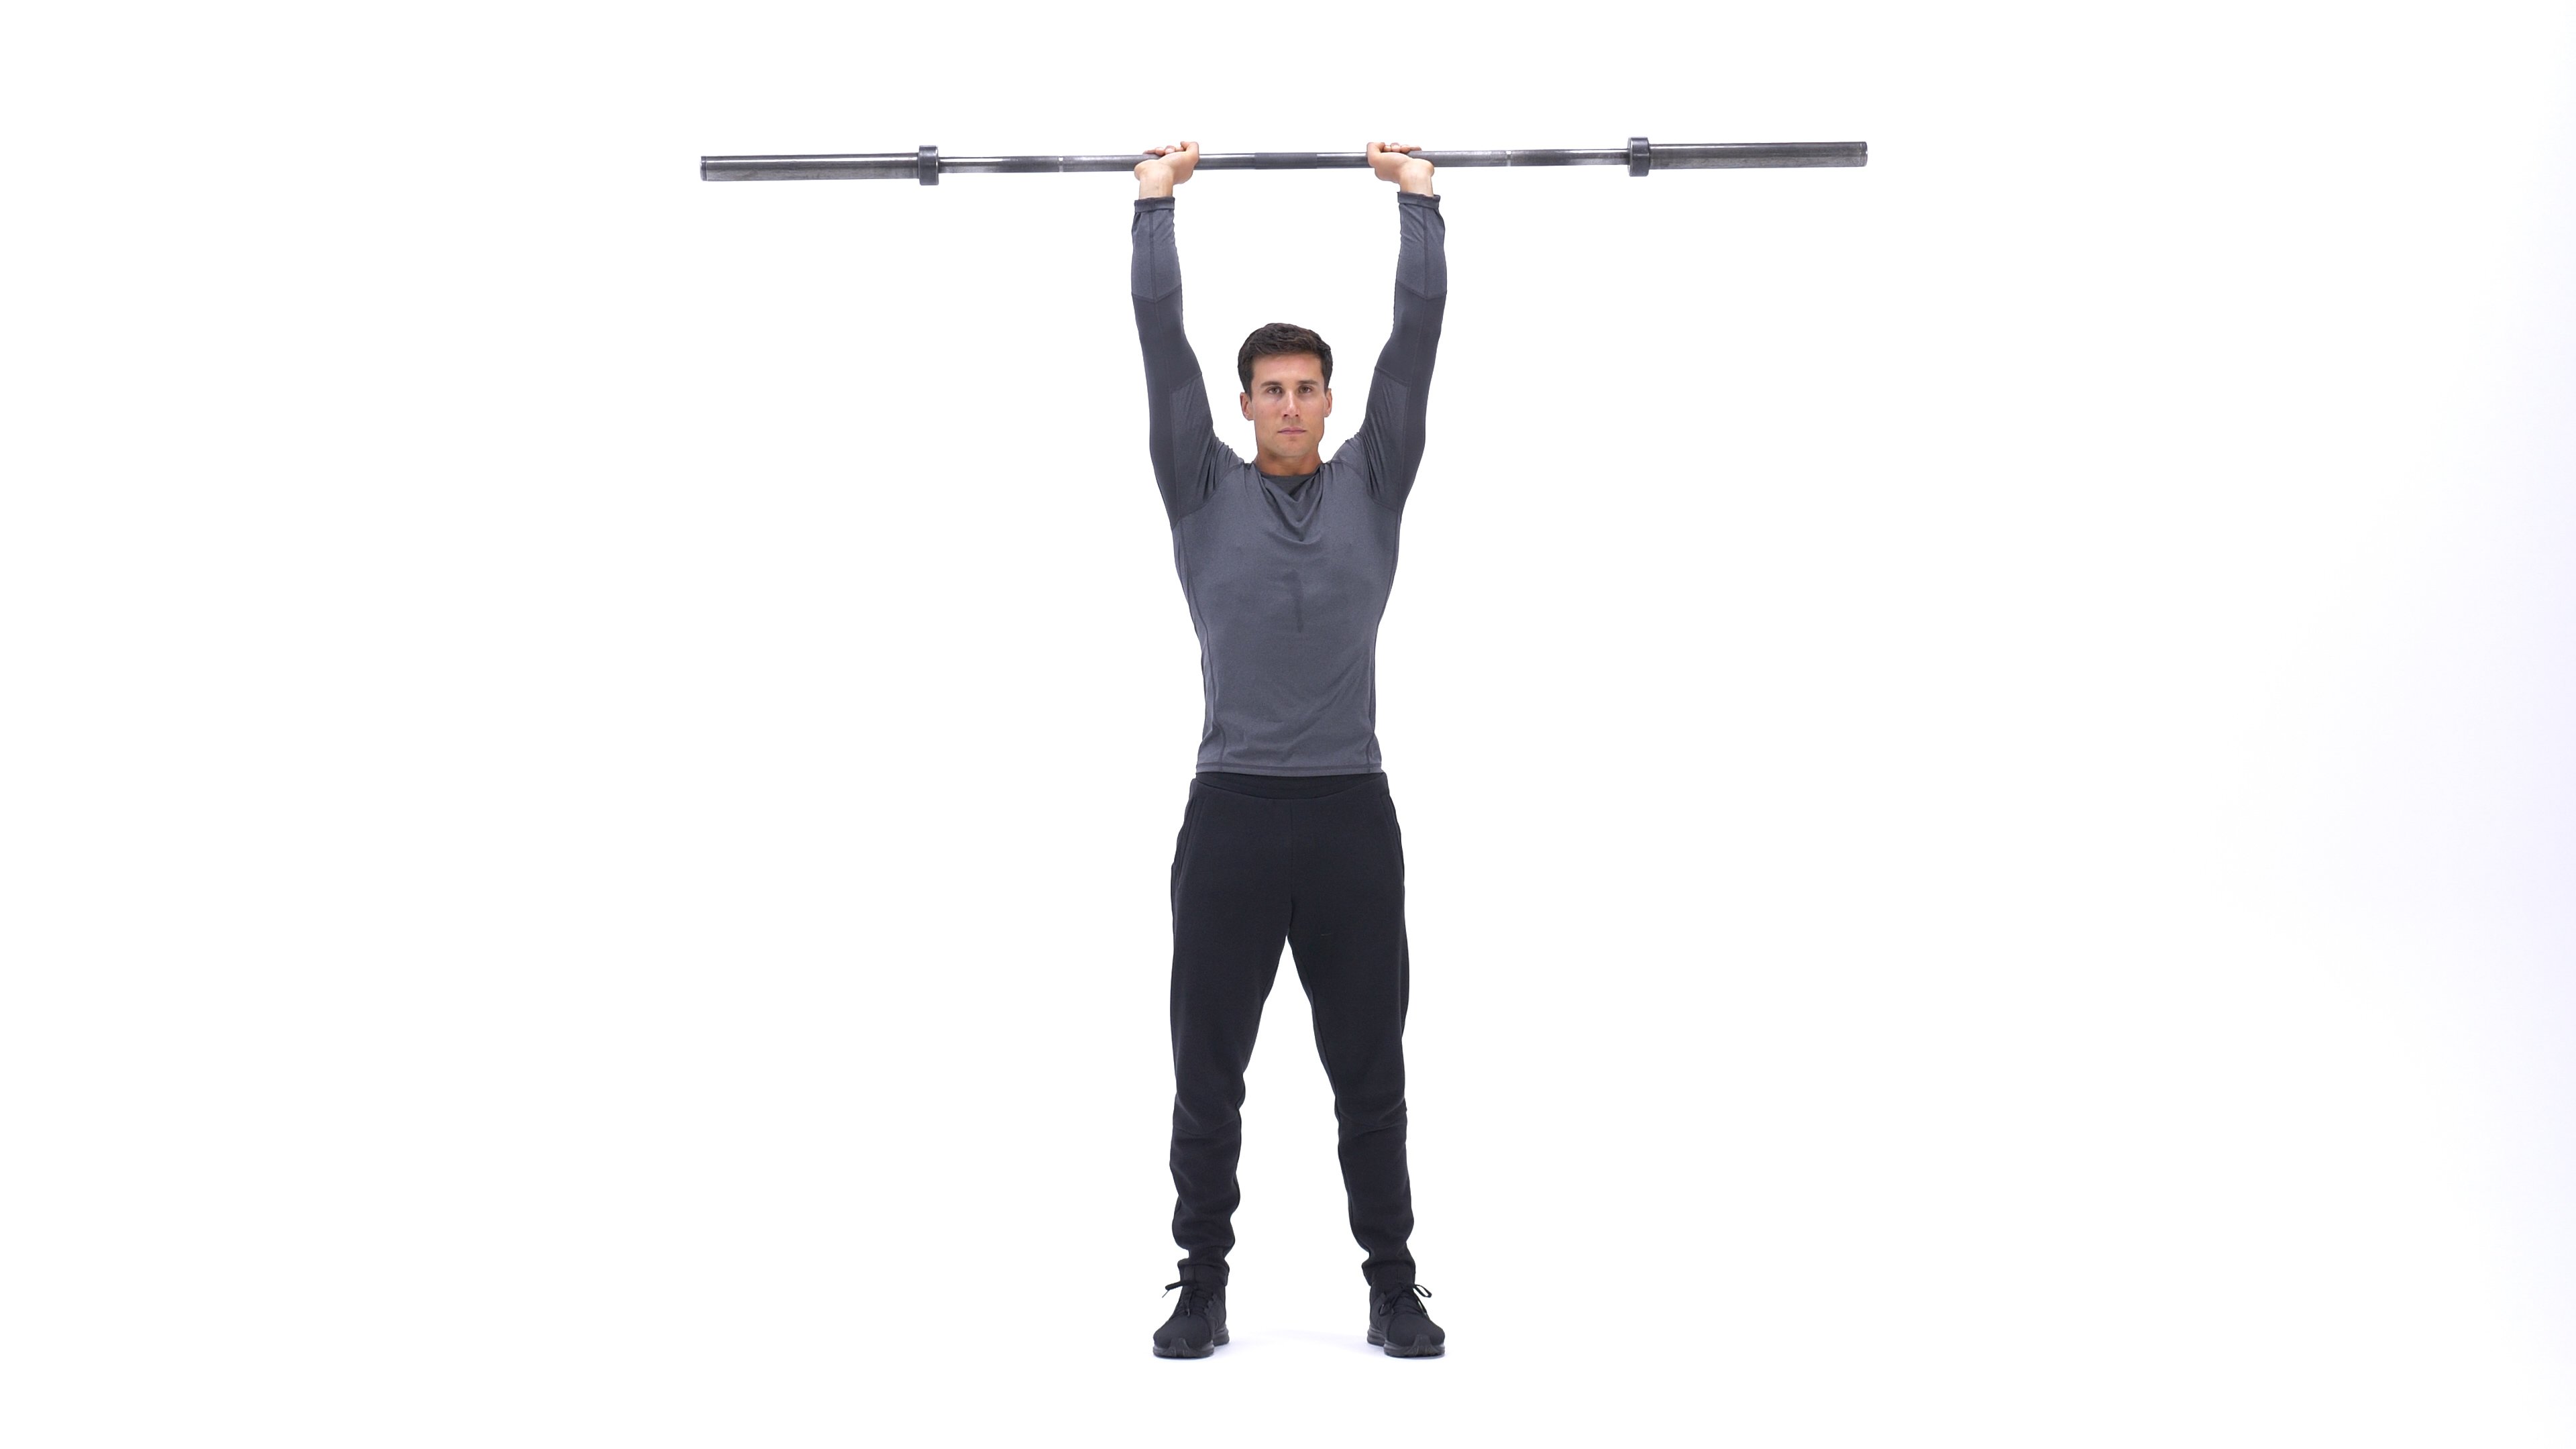
Standing overhead triceps extensions are a great exercise for targeting the triceps muscles. This exercise is also known as the French press or the skull crusher. It can be performed with a barbell, dumbbells, or an EZ bar. In this article, we will discuss the benefits of standing overhead triceps extensions, how to perform the exercise, and variations of the exercise.
Benefits of Standing Overhead Triceps Extensions
Standing overhead triceps extensions are a great exercise for building strength and size in the triceps muscles. The triceps muscles are responsible for extending the elbow joint and are used in many upper body movements such as pushing and pulling. By strengthening the triceps muscles, you can improve your overall upper body strength and performance.
Standing overhead triceps extensions are also a great exercise for improving your shoulder stability and mobility. Since the exercise requires you to hold the weight overhead, it can help improve your shoulder strength and stabilizers. This can help prevent shoulder injuries and improve your posture.
How to Perform Standing Overhead Triceps Extensions

To perform standing overhead triceps extensions, follow these steps:
- Stand with your feet shoulder-width apart and hold the weight with both hands behind your head.
- Keep your elbows close to your head and slowly lower the weight behind your head until your forearms are parallel to the ground.
- Pause for a moment and then slowly raise the weight back up to the starting position.
- Repeat for the desired number of reps.
When performing this exercise, it is important to keep your elbows close to your head and to use a weight that you can control. Avoid using momentum to lift the weight and focus on using your triceps muscles to perform the movement.
Variations of Standing Overhead Triceps Extensions

There are several variations of standing overhead triceps extensions that you can perform to add variety to your workout:
- Dumbbell standing overhead triceps extensions
- EZ bar standing overhead triceps extensions
- Single-arm standing overhead triceps extensions
- Seated overhead triceps extensions
Each of these variations targets the triceps muscles in slightly different ways and can be used to add variety to your workout routine.
Conclusion
Standing overhead triceps extensions are a great exercise for building strength and size in the triceps muscles. They are also a great exercise for improving your shoulder stability and mobility. By adding standing overhead triceps extensions to your workout routine, you can improve your overall upper body strength and performance.
Related video of Standing Overhead Triceps Extensions
Plank shoulder taps are a popular exercise that can help you improve your core strength, stability, and balance. This exercise is beneficial for people of all fitness levels, and it targets several muscles in the body. In this article, we will discuss the muscles worked during plank shoulder taps and how to perform this exercise correctly.
What Are Plank Shoulder Taps?
Plank shoulder taps are a variation of the traditional plank exercise. Instead of holding a static plank position, you will be tapping your shoulders with your hands while maintaining the plank position. This exercise targets your core muscles, including your abs, lower back, and obliques, as well as your shoulders and chest.
How to Perform Plank Shoulder Taps
Here are the steps to perform plank shoulder taps:
- Start in a high plank position with your hands shoulder-width apart and your feet hip-width apart.
- Engage your core muscles and keep your back straight.
- Lift your right hand and tap your left shoulder.
- Return your right hand to the starting position and repeat with your left hand tapping your right shoulder.
- Continue alternating shoulder taps for 30-60 seconds.

Muscles Worked During Plank Shoulder Taps
Plank shoulder taps target several muscles in the body, including:
- Abdominals: The rectus abdominis and transverse abdominis muscles are engaged to stabilize the spine and maintain the plank position.
- Obliques: The internal and external oblique muscles are activated to rotate the torso and maintain balance.
- Lower back: The erector spinae muscles are engaged to maintain a neutral spine and prevent any excessive arching or rounding.
- Shoulders: The deltoid muscles are activated to lift and lower the arms during the shoulder taps.
- Chest: The pectoralis major muscles are engaged to stabilize the shoulders and prevent any excessive movement.
Tips for Performing Plank Shoulder Taps Correctly
Here are some tips to help you perform plank shoulder taps correctly:
- Engage your core: Keep your abs and lower back muscles engaged throughout the exercise to maintain proper form and prevent any sagging or arching.
- Keep your hips level: Avoid any twisting or tilting of your hips during the shoulder taps. Keep them level with the ground.
- Don't rush: Perform the shoulder taps slowly and with control to maximize the benefits of the exercise.
- Breathe: Inhale as you lift your hand and exhale as you tap your shoulder. Maintain a steady breathing pattern throughout the exercise.
Variations of Plank Shoulder Taps
If you want to make the plank shoulder taps more challenging, you can try these variations:
- Mountain climbers: Perform a plank shoulder tap, then bring your knee up to your chest and tap it with your opposite elbow. Alternate sides.
- Single-arm shoulder taps: Perform shoulder taps with one arm while keeping the other arm extended in front of you.
- Side plank shoulder taps: Start in a side plank position and perform shoulder taps on the top arm.
Conclusion
Plank shoulder taps are an effective exercise that can help you improve your core strength, stability, and balance. This exercise targets several muscles in the body, including your abs, lower back, obliques, shoulders, and chest. By incorporating plank shoulder taps into your workout routine, you can enhance your overall fitness and achieve your fitness goals.
Related video of Plank Shoulder Taps Muscles Worked
Before starting any chest workout, it is essential to warm up your chest properly. Proper warm-up exercises can help prevent injury and improve your performance. This article will provide you with some of the best chest workout warm-up exercises.
Why Warm Up Your Chest?
Warming up your chest muscles is crucial to avoid injury. A proper warm-up increases blood flow to the muscles, which helps to prepare them for the upcoming workout. It also helps to increase your range of motion and flexibility, which further reduces the risk of injury.
Dynamic Warm-Up Exercises

Dynamic warm-up exercises are very helpful in preparing your chest muscles for the workout. They involve movement and stretching, which activate the muscles and increase the blood flow.
Some of the best dynamic warm-up exercises include:
- Arm Circles
- Shoulder Dislocations
- Chest Opener
- Chest Stretch
- Push-Ups
Static Stretching

Static stretching is also essential before any chest workout. It helps to improve flexibility and range of motion, which further reduces the risk of injury. Static stretching involves holding a stretch in one position without moving.
Some of the best static stretching exercises for your chest include:
- Wall Chest Stretch
- Doorway Chest Stretch
- Chest Fly Stretch
- Chest Press Stretch
Breathing Exercises
Breathing exercises can also be helpful in preparing your chest muscles for a workout. Deep breathing exercises help to increase blood flow and oxygenation to the muscles, which can help improve performance and prevent injury.
Some of the best breathing exercises for your chest include:
- Deep Breathing
- Pranayama Breathing
- Bhastrika Breathing
- Kapalbhati Breathing
Conclusion
Warming up your chest muscles before any workout is essential to prevent injury and improve your performance. Dynamic warm-up exercises, static stretching, and breathing exercises can help prepare your chest muscles for the workout. Incorporate these exercises into your routine to avoid injury and maximize your chest workout results.
Related video of Chest Workout Warm Up

If you are looking to tone and strengthen your glutes, then look no further than the hip thrust exercise. This exercise is a great way to work your hip extensors, which include the gluteus maximus, hamstrings, and adductor magnus muscles. In this article, we will explore the hip thrust muscles worked in detail, as well as the benefits of this exercise.
What are the Hip Thrust Muscles Worked?

The hip thrust primarily targets the gluteus maximus muscle, which is the largest muscle in the buttocks. This muscle is responsible for extending the hip joint, and it plays a key role in activities such as standing up, climbing stairs, and running. When you perform the hip thrust, you are working this muscle in a targeted and isolated way.
In addition to the gluteus maximus, the hip thrust also works the hamstrings, which are the muscles located on the back of the thigh. These muscles are responsible for flexing the knee joint and extending the hip joint. By working the hamstrings in conjunction with the glutes, you can achieve a more balanced and functional lower body.
Finally, the adductor magnus muscle, which is located on the inner thigh, is also worked during the hip thrust exercise. This muscle is responsible for adducting the hip joint, or bringing the thigh towards the midline of the body. By working this muscle, you can improve your overall lower body strength and stability.
Benefits of Hip Thrust Muscles Worked

The hip thrust exercise offers a number of benefits for those looking to tone and strengthen their glutes. First and foremost, it is an effective way to build muscle in the gluteus maximus, which can give your butt a more lifted and toned appearance.
In addition, the hip thrust can help to improve your overall lower body strength and stability. By working the glutes, hamstrings, and adductor magnus muscles, you can achieve a more balanced and functional lower body, which can help to reduce the risk of injury during other exercises and activities.
Finally, the hip thrust is a relatively simple exercise that can be done with minimal equipment. All you need is a bench or sturdy surface to lean against, as well as a weight or resistance band to add additional resistance. This makes it a convenient and accessible exercise for people of all fitness levels.
How to Perform the Hip Thrust Exercise
If you are interested in incorporating the hip thrust exercise into your workout routine, here is a step-by-step guide:
- Start by sitting on the ground with your back against a bench or sturdy surface, with your feet flat on the ground and your knees bent.
- Place a weight or resistance band across your hips, and hold it in place with your hands.
- Engage your core muscles, and slowly lift your hips off the ground until your body forms a straight line from your knees to your shoulders.
- Pause at the top of the movement, and then slowly lower your hips back down to the ground.
- Repeat for 10-12 repetitions, and then rest for 30-60 seconds before performing another set.
Tips for Performing the Hip Thrust Exercise

Here are some tips to help you get the most out of your hip thrust exercise:
- Focus on squeezing your glutes as you lift your hips off the ground, and hold the contraction for 1-2 seconds at the top of the movement.
- Keep your feet flat on the ground throughout the exercise, and avoid lifting your toes or heels.
- Use a weight or resistance band that is challenging but still allows you to maintain good form.
- Breathe deeply and rhythmically throughout the exercise, exhaling as you lift your hips and inhaling as you lower them.
- Perform the exercise slowly and with control, and avoid using momentum to lift your hips.
Conclusion
The hip thrust exercise is a great way to tone and strengthen your glutes, as well as improve your overall lower body strength and stability. By targeting the gluteus maximus, hamstrings, and adductor magnus muscles, you can achieve a more balanced and functional lower body, which can help to reduce the risk of injury during other exercises and activities. So if you are looking to build a better butt, give the hip thrust a try!
Related video of Hip Thrust Muscles Worked

Introduction
If you're looking to target your lower body muscles, the sumo stance leg press is an excellent exercise to consider. This variation of the leg press engages different muscles compared to the traditional leg press, and it's especially useful for those with wider hips. In this article, we'll discuss the sumo stance leg press in detail, including its benefits, how to perform it correctly, and some tips to keep in mind.The Benefits of the Sumo Stance Leg Press
The sumo stance leg press is an excellent exercise to build lower body strength and size. It primarily targets the quads, hamstrings, and glutes. Additionally, it places less stress on your lower back compared to the traditional leg press, making it a safer option for those with back issues. The sumo stance also helps you to engage your adductors, which are the muscles on the inside of your thighs.How to Perform the Sumo Stance Leg Press
To perform the sumo stance leg press, follow these steps:- Adjust the seat of the leg press machine so that your knees are bent at a 90-degree angle when your feet are on the platform.
- Place your feet wider than shoulder-width apart, with your toes pointing outwards.
- Push the platform away from you, extending your legs fully.
- Lower the platform back down slowly, bending your knees and keeping your back flat against the seat.
- Repeat for the desired number of repetitions.
Tips for Performing the Sumo Stance Leg Press
To get the most out of the sumo stance leg press, keep these tips in mind:- Ensure that your knees are tracking in line with your toes throughout the exercise.
- Avoid locking your knees at the top of the movement, as this can increase your risk of injury.
- Keep your feet flat on the platform throughout the movement.
- Don't let your hips come off the seat as you lower the platform.
- Breathe out as you push the platform away from you, and breathe in as you lower it back down.
Variations of the Sumo Stance Leg Press
Here are some variations of the sumo stance leg press you can try:- Single-leg sumo stance leg press: Perform the exercise with one leg at a time, alternating between legs.
- Narrow sumo stance leg press: Bring your feet closer together, with your toes still pointing outwards.
- Paused sumo stance leg press: Pause for a few seconds at the bottom of the movement before pushing the platform back up.
Conclusion
The sumo stance leg press is an excellent exercise to target your lower body muscles, especially if you have wider hips. It primarily targets the quads, hamstrings, and glutes, and it's a safer option for those with back issues. Remember to keep your form correct and breathe properly throughout the exercise, and consider trying some of the variations we've discussed. Incorporate the sumo stance leg press into your lower body workout routine to see improvements in your strength and size.Related video of Sumo Stance Leg Press: A Comprehensive Guide

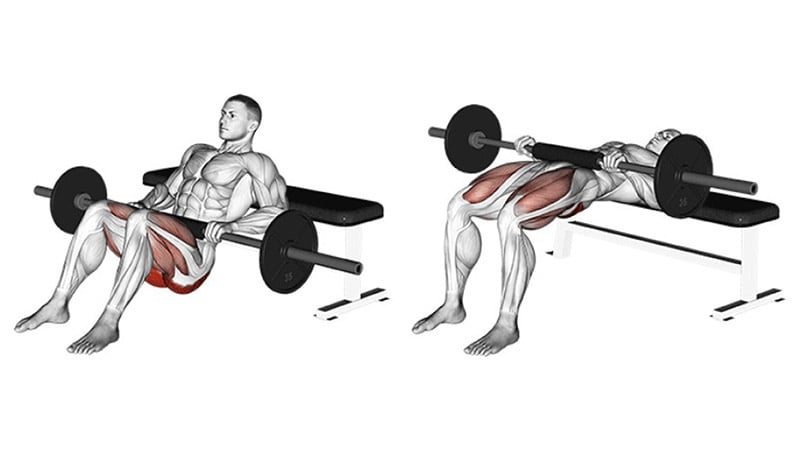
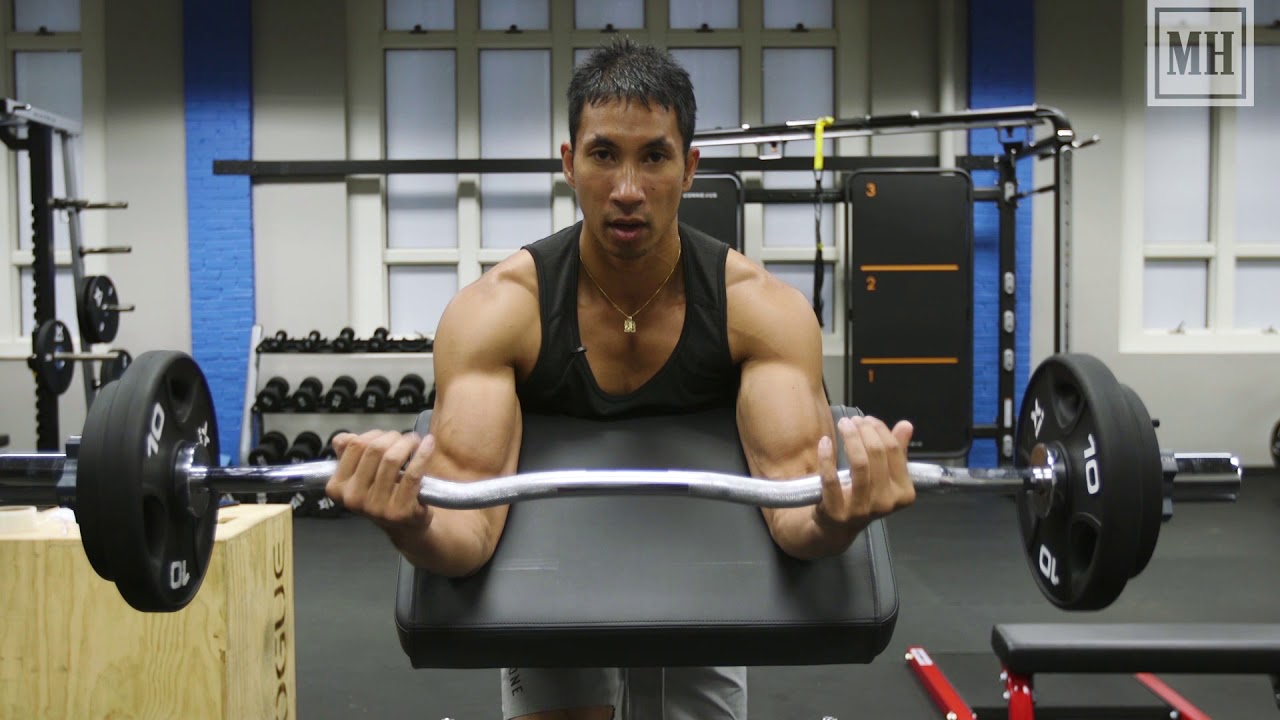
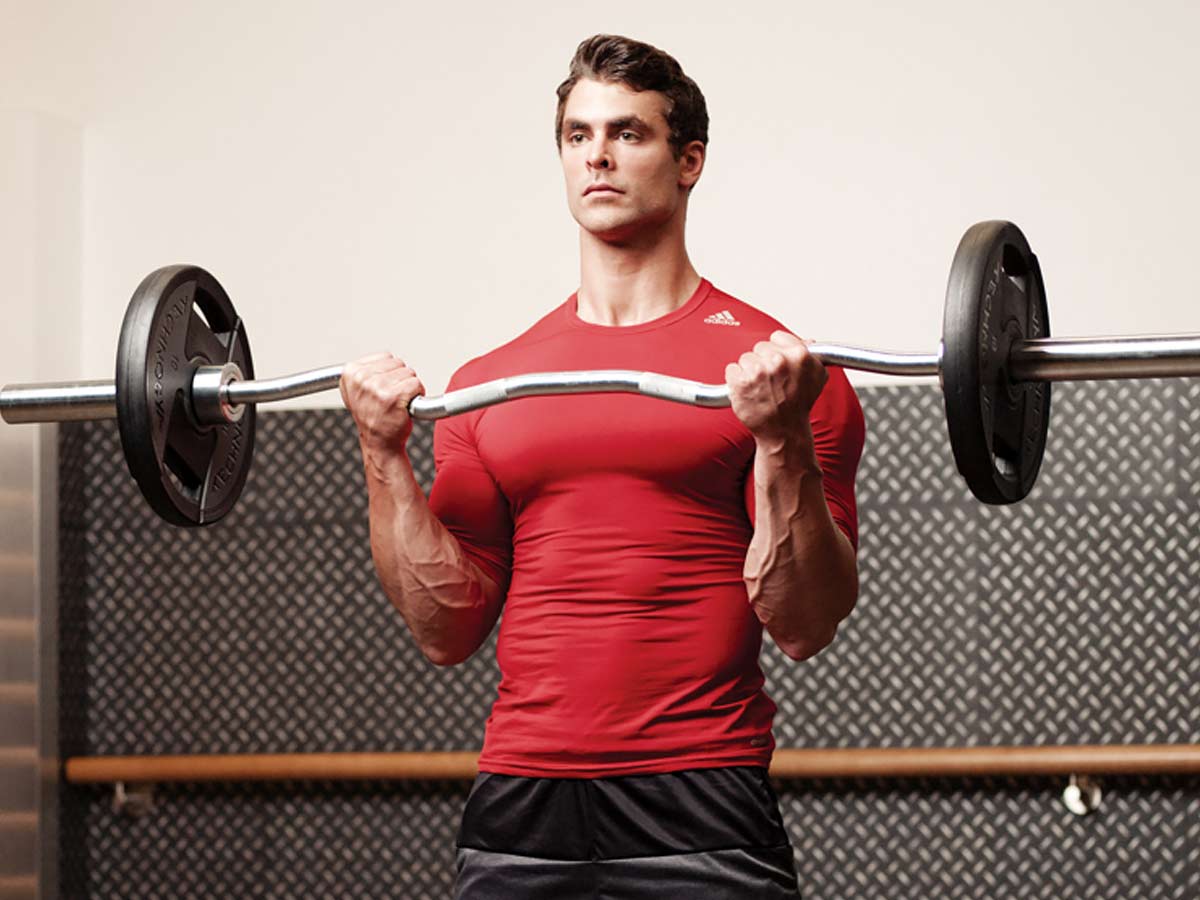
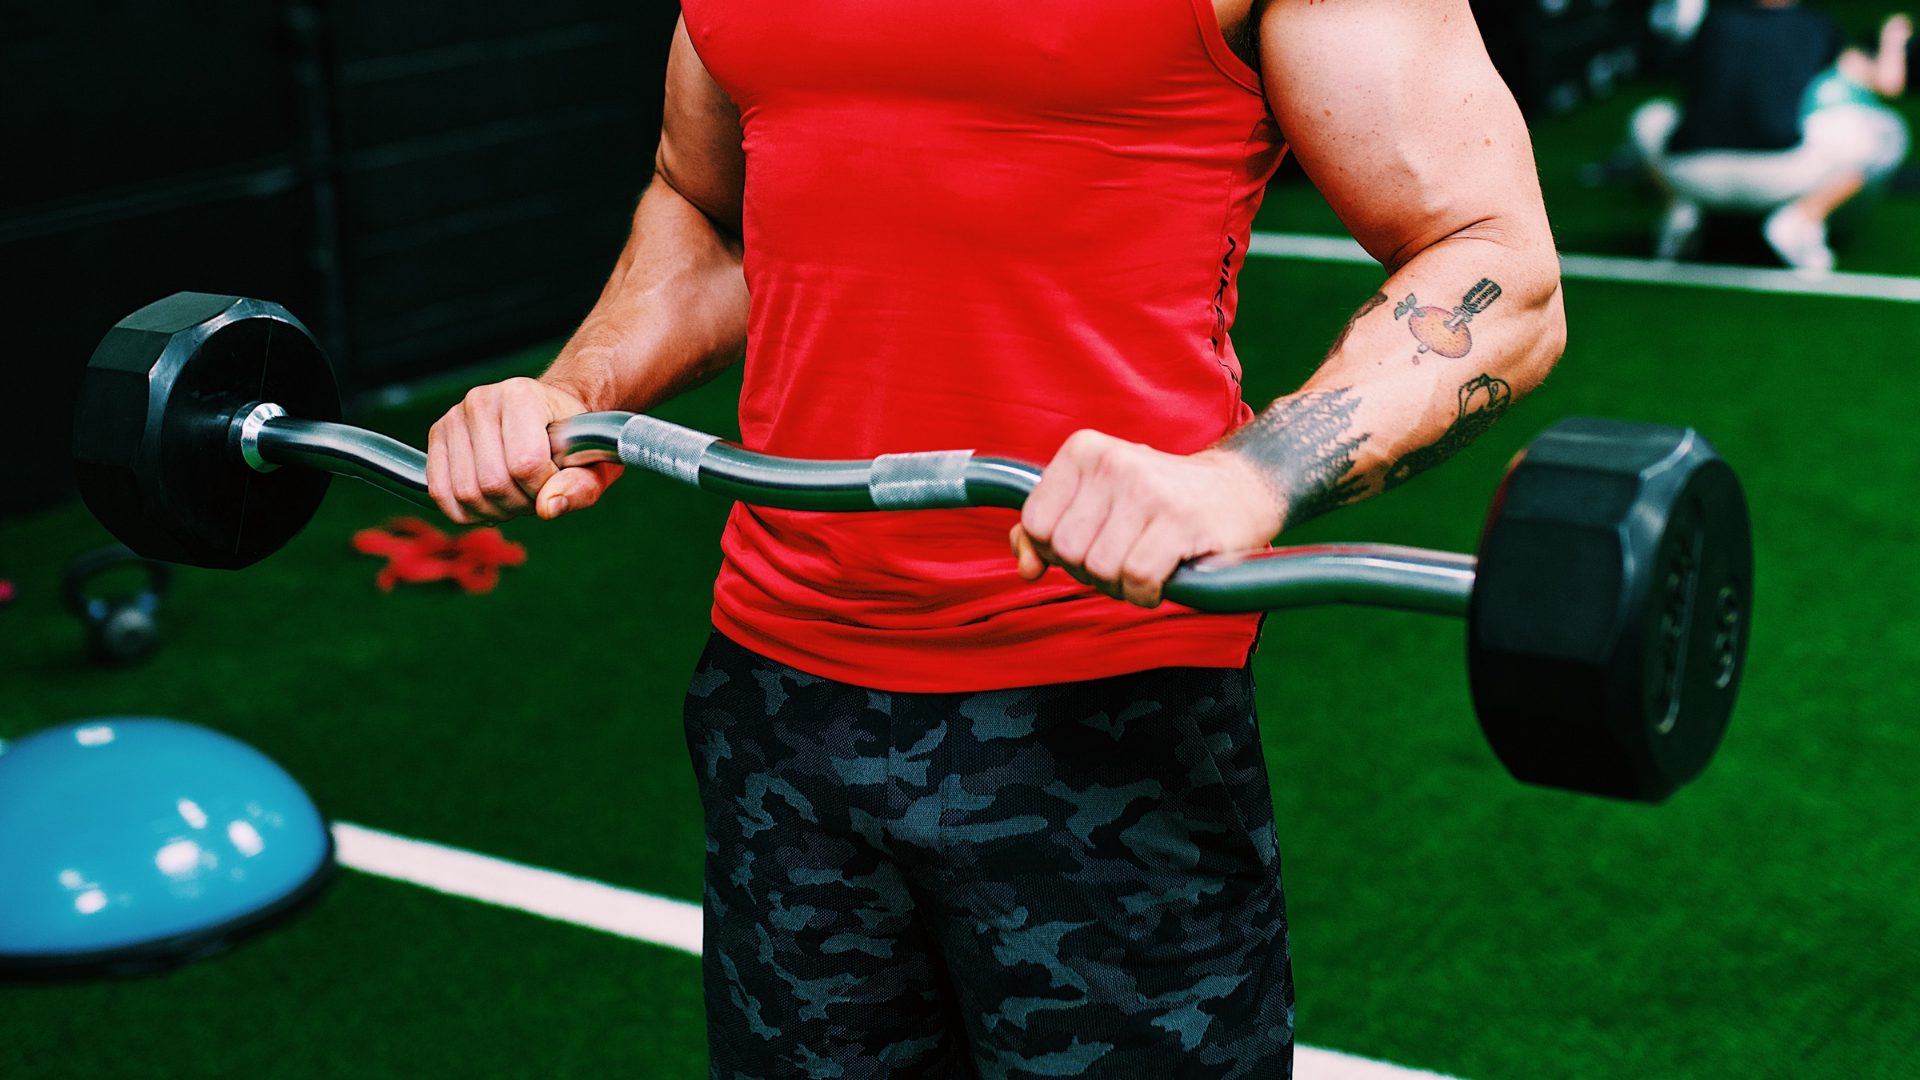
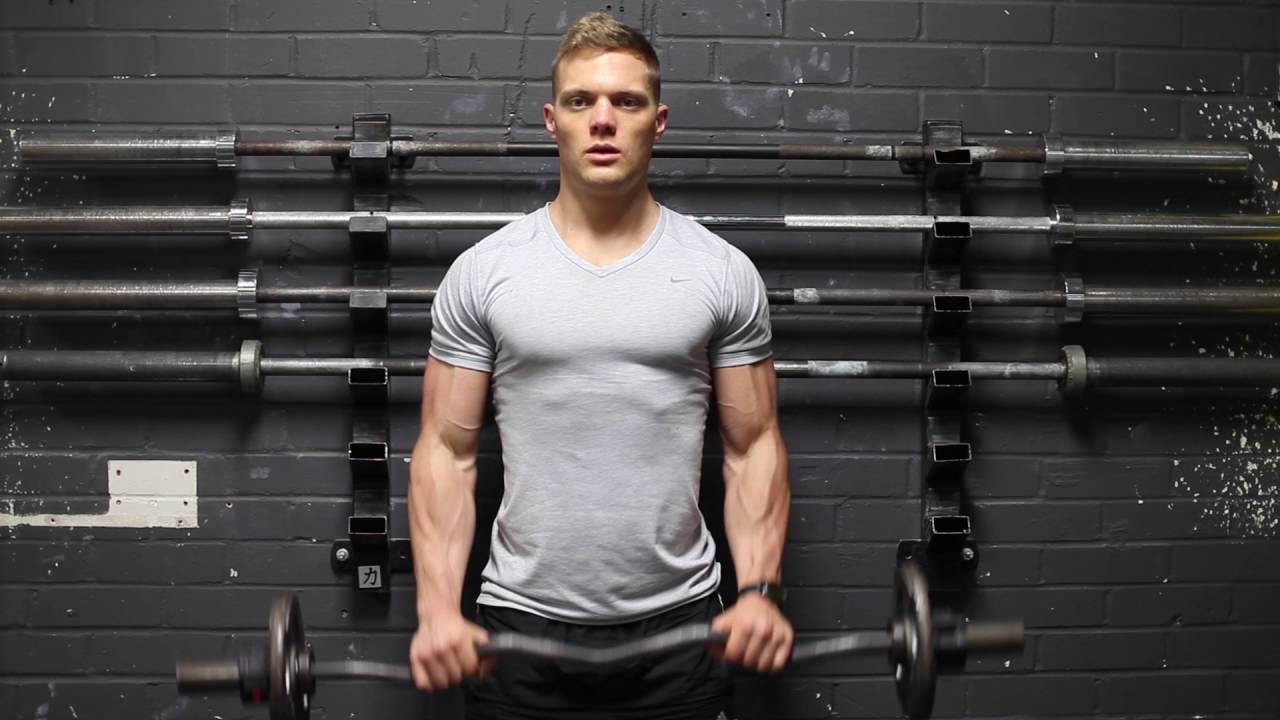
When it comes to working out, there are many different tools and equipment available to help you achieve your fitness goals. One such tool is the Ez curl bar, which is designed to help you perform a variety of exercises that target your arms, shoulders, and chest. In this article, we will explore some of the best exercises for the Ez curl bar and how to perform them correctly.
Bicep Curls

Bicep curls are one of the most popular exercises for the Ez curl bar, and for good reason. This exercise targets your biceps, which are the muscles located on the front of your upper arm. To perform this exercise, grab the Ez curl bar with an underhand grip and lift it towards your shoulders, keeping your elbows close to your body. Lower the bar back down to the starting position and repeat for several sets.
Tricep Extensions
Tricep extensions are another popular exercise that can be performed with the Ez curl bar. This exercise targets the muscles located on the back of your upper arm, which are known as your triceps. To perform this exercise, grab the Ez curl bar with an overhand grip and lift it over your head. Lower the bar behind your head, keeping your elbows close to your head, then lift it back up to the starting position and repeat for several sets.
Shoulder Presses

Shoulder presses are a great exercise for targeting your shoulder muscles, which are important for maintaining good posture and upper body strength. To perform this exercise, grab the Ez curl bar with an overhand grip and lift it to shoulder height. Push the bar up over your head, then lower it back down to the starting position and repeat for several sets.
Chest Presses
Chest presses are another great exercise for the Ez curl bar, as they target your chest muscles and help to build upper body strength. To perform this exercise, lie flat on a bench with your feet on the floor and grab the Ez curl bar with an overhand grip. Lift the bar up and over your chest, then lower it down to the starting position and repeat for several sets.
Reverse Curls

Reverse curls are a variation of the bicep curl that target the muscles located on the back of your upper arm. To perform this exercise, grab the Ez curl bar with an overhand grip and lift it towards your shoulders, keeping your elbows close to your body. Lower the bar back down to the starting position and repeat for several sets.
Hammer Curls

Hammer curls are another variation of the bicep curl that target your biceps and forearms. To perform this exercise, grab the Ez curl bar with a neutral grip (palms facing each other) and lift it towards your shoulders, keeping your elbows close to your body. Lower the bar back down to the starting position and repeat for several sets.
Close-Grip Bench Presses

Close-grip bench presses are a great exercise for targeting your triceps and chest muscles. To perform this exercise, lie flat on a bench with your feet on the floor and grab the Ez curl bar with a close grip (hands close together). Lift the bar up and over your chest, then lower it down to the starting position and repeat for several sets.
Skull Crushers
Skull crushers are another popular exercise for the Ez curl bar that target your triceps. To perform this exercise, lie flat on a bench with your feet on the floor and grab the Ez curl bar with an overhand grip. Lift the bar up over your head, then lower it down towards your forehead, keeping your elbows close to your head. Lift the bar back up to the starting position and repeat for several sets.
Conclusion
The Ez curl bar is a versatile piece of equipment that can help you achieve your fitness goals by targeting a variety of upper body muscles. By incorporating these exercises into your workout routine, you can build strength and develop defined, toned muscles. Remember to always use proper form and start with lighter weights before increasing the intensity of your workout. Happy lifting!
Related video of Exercises For Ez Curl Bar

The side leg raise exercise is a great way to strengthen and tone your outer thighs, hips, and glutes. It is a simple exercise that can be done anywhere, without the need for any equipment. In this article, we will discuss the benefits of the side leg raise exercise, how to do it, and some variations that you can try.
Benefits of Side Leg Raise Exercise

The side leg raise exercise is a great way to target your outer thighs, hips, and glutes. It can help to tone and firm these areas, giving you a more defined and lifted appearance. Additionally, it can help to improve your balance and stability, which can be beneficial in other areas of your life.
This exercise is also great for strengthening your core, as you need to engage your abdominal muscles to maintain proper form. It can also help to improve your posture, as it requires you to stand up straight and tall.
How to Do Side Leg Raise Exercise

To do the side leg raise exercise, follow these steps:
- Stand tall with your feet hip-width apart and your hands on your hips.
- Lift your left leg out to the side, keeping it straight.
- Pause for a moment at the top of the movement, then lower your leg back down.
- Repeat on the other side.
Do 10-15 repetitions on each side, then rest for 30 seconds before repeating for another set. Aim to do 2-3 sets of this exercise.
Variations of Side Leg Raise Exercise

There are several variations of the side leg raise exercise that you can try to make it more challenging or to target different areas. Here are a few examples:
- Bent knee side leg raise: Instead of keeping your leg straight, bend your knee and lift your leg up towards your hip.
- Side plank with leg lift: Start in a side plank position, then lift your top leg up towards the sky.
- Resistance band side leg raise: Place a resistance band around your ankles and lift your leg out to the side against the resistance.
Try incorporating these variations into your workout routine to keep things interesting and challenging.
Tips for Safe and Effective Side Leg Raise Exercise

Here are some tips to get the most out of your side leg raise exercise:
- Keep your core engaged throughout the movement to maintain proper form.
- Don't lean over to one side or the other - keep your body straight and upright.
- Don't lift your leg too high - aim for a 45-degree angle from your body.
- Breathe deeply and rhythmically throughout the exercise.
- If you have any pain or discomfort, stop the exercise and consult a healthcare professional.
Conclusion
The side leg raise exercise is a simple but effective way to strengthen and tone your outer thighs, hips, and glutes. It can help to improve your balance, stability, and posture, while also giving you a more defined and lifted appearance. Try incorporating this exercise into your workout routine and see the benefits for yourself!
Related video of Side Leg Raise Exercise
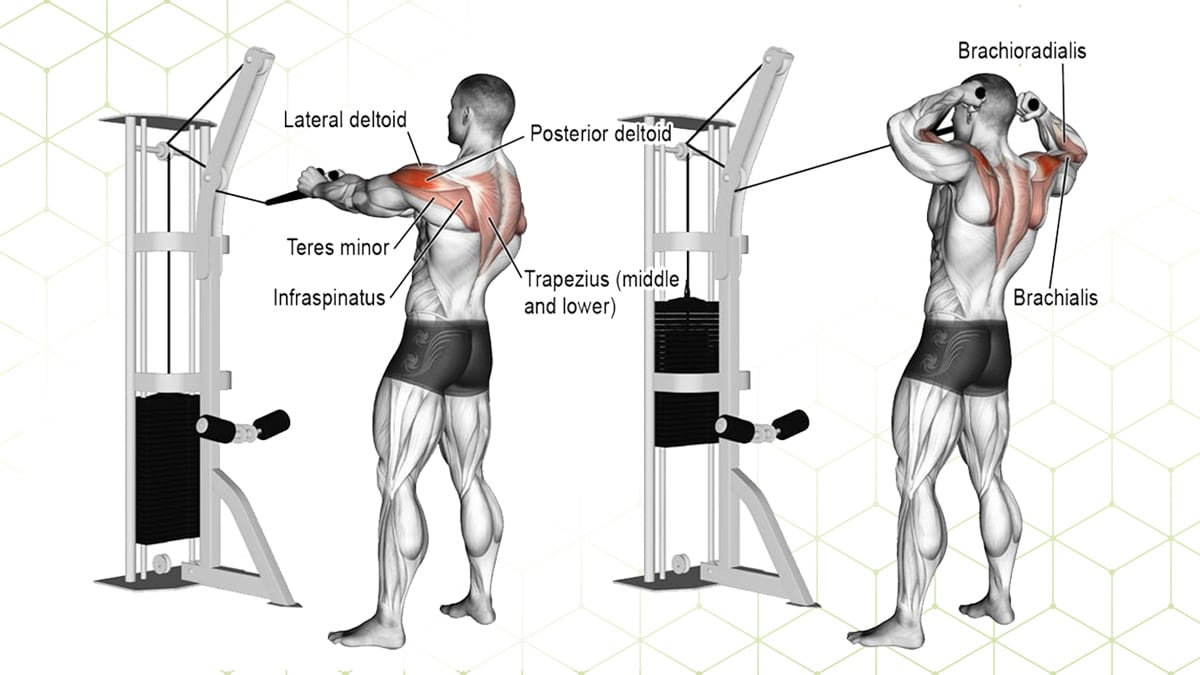
The rear deltoid muscle is located at the back of the shoulder and is responsible for the extension, abduction, and external rotation of the arm. This muscle is often neglected in training and can cause imbalances and weak points in the upper body if not properly worked. In this article, we will explore the various exercises and movements that target the rear delt muscles and how they are worked.
1. Rear Delt Flyes

Rear delt flyes are one of the best exercises for targeting the rear delt muscles. This movement can be performed using dumbbells, cables, or a machine. To perform this exercise, stand with your feet shoulder-width apart and hold the weight in front of you with your palms facing each other. Slowly lift the weight out to the sides, keeping your arms straight, until your arms are parallel to the floor. Lower the weight back down and repeat for several reps.
2. Face Pulls

Face pulls are another great exercise for targeting the rear delt muscles. This exercise can be performed using a cable machine or resistance bands. To perform this exercise, attach a rope to a cable machine or resistance band and pull the rope towards your face while keeping your elbows high. Squeeze your shoulder blades together at the top of the movement and slowly lower the weight back down.
3. Bent-Over Lateral Raises

Bent-over lateral raises are a great exercise for targeting the rear delt muscles as well as the upper back. To perform this exercise, stand with your feet shoulder-width apart and bend forward at the waist. Hold a weight in each hand and lift the weights out to the sides until your arms are parallel to the floor. Squeeze your shoulder blades together at the top of the movement and slowly lower the weights back down.
4. Reverse Pec Deck Flyes

Reverse pec deck flyes are a machine exercise that targets the rear delt muscles. To perform this exercise, sit with your back against the machine and hold onto the handles. Pull the handles towards your chest while squeezing your shoulder blades together at the top of the movement. Slowly lower the handles back down and repeat for several reps.
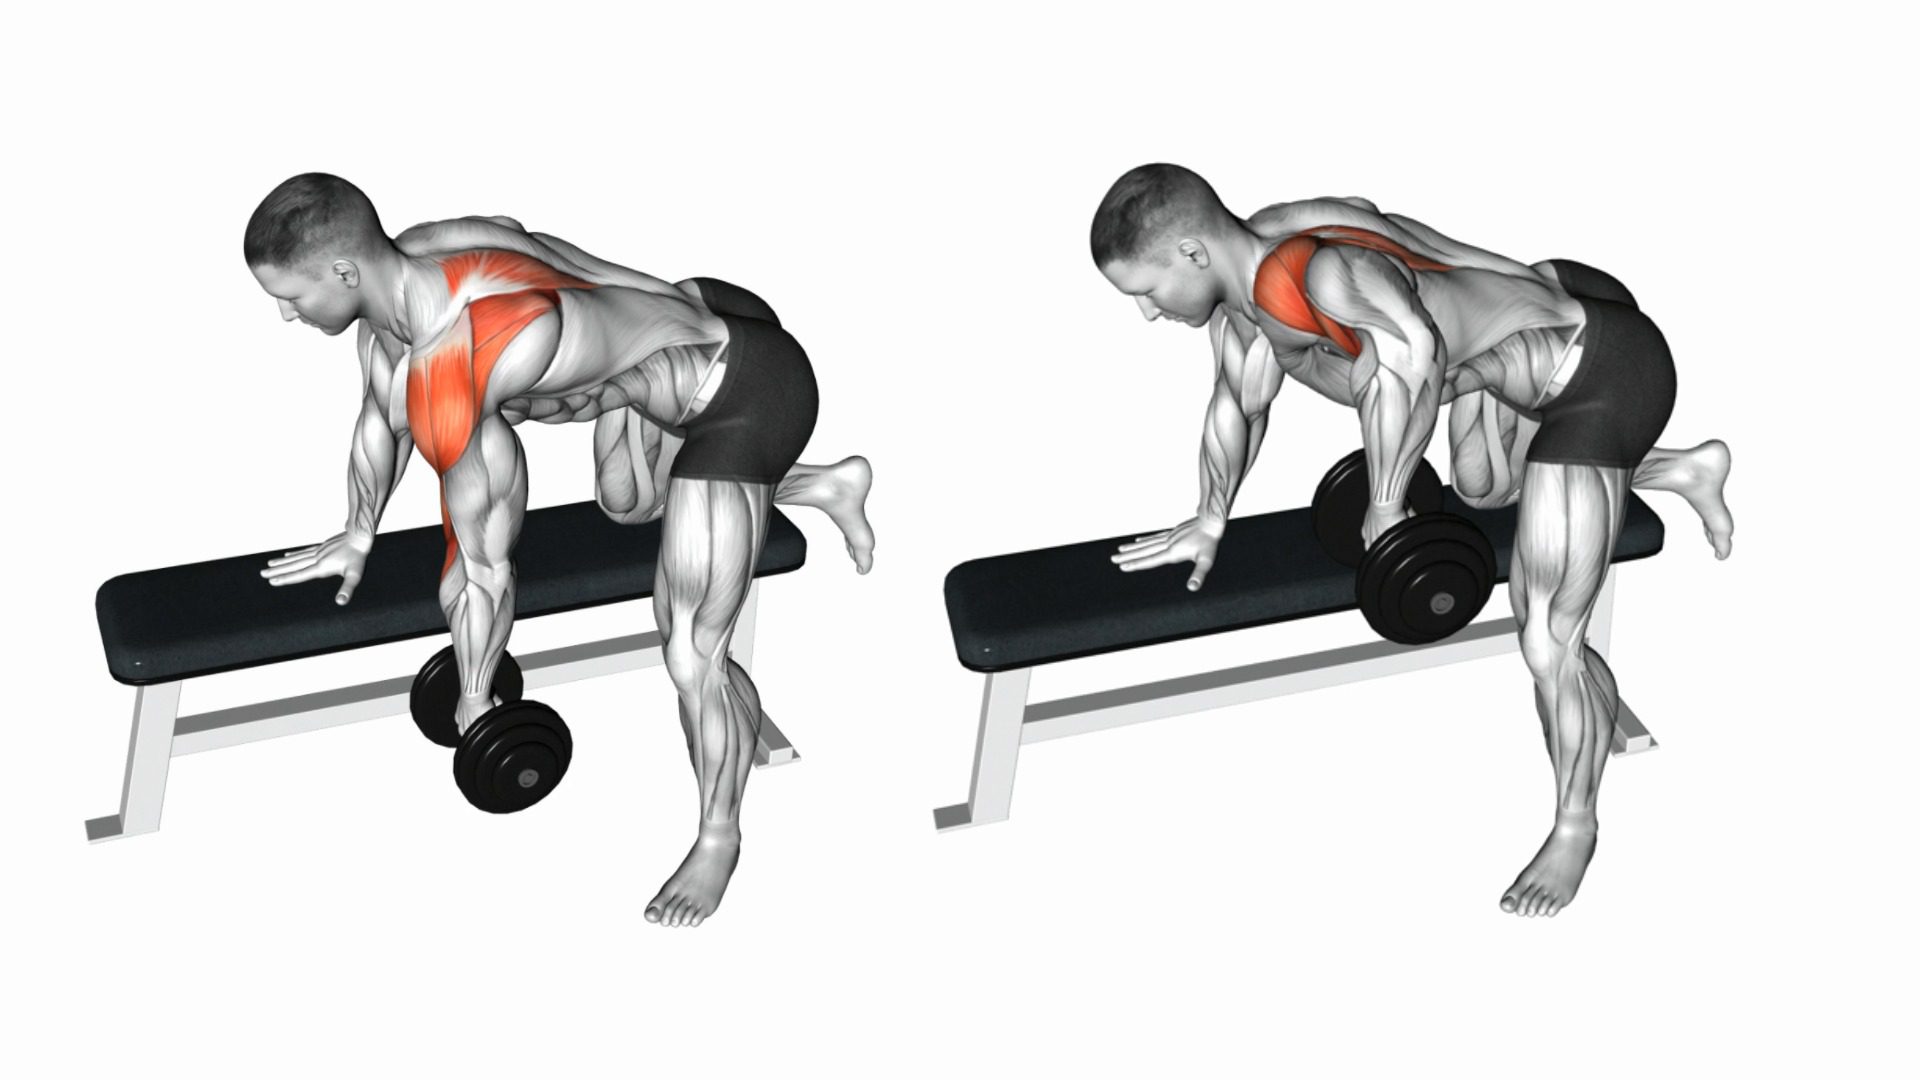
5. Rear Delt Rows

Rear delt rows are a great exercise for targeting the rear delt muscles as well as the upper back. To perform this exercise, hold a weight in each hand and bend forward at the waist. Pull the weights towards your chest while squeezing your shoulder blades together at the top of the movement. Slowly lower the weights back down and repeat for several reps.
6. Cable Rear Delt Pulls
Cable rear delt pulls are a great exercise for targeting the rear delt muscles using a cable machine. To perform this exercise, attach a rope to a cable machine and pull the rope towards your body while keeping your elbows high. Squeeze your shoulder blades together at the top of the movement and slowly lower the weight back down.
7. Inverted Rows

Inverted rows are a great exercise for targeting the rear delt muscles as well as the upper back. To perform this exercise, lie on your back underneath a bar or Smith machine and grab onto the bar with an overhand grip. Pull your chest towards the bar while squeezing your shoulder blades together at the top of the movement. Slowly lower yourself back down and repeat for several reps.
Conclusion
The rear delt muscles are an important part of the upper body and should not be neglected in training. By incorporating exercises that target the rear delt muscles, you can improve your overall upper body strength and prevent imbalances and weak points. Try adding some of these exercises to your workout routine and see the results for yourself!
Related video of Rear Delt Muscles Worked

Introduction
When it comes to building a well-rounded and muscular physique, the back is one of the most important muscle groups to focus on. Not only does a strong back provide a solid foundation for other big lifts, but it also helps to improve posture, reduce the risk of injury, and enhance overall athletic performance.One of the most effective exercises for building a strong and powerful back is the incline dumbbell row. In this article, we'll take a closer look at the incline DB row muscles worked, how to properly perform the exercise, and some tips for maximizing your results.What Muscles Are Worked in the Incline DB Row?
The incline DB row is a compound exercise that primarily targets the lats, rhomboids, and traps. However, it also engages a number of other muscles in the back, arms, and shoulders, including:- Rhomboids
- Trapezius
- Lats
- Rear deltoids
- Biceps
- Forearms
How to Perform the Incline DB Row
Here's a step-by-step guide for performing the incline DB row:- Set up an incline bench at a 45-degree angle.
- Grab a pair of dumbbells and sit on the bench with your chest against the backrest.
- Keep your feet firmly planted on the ground and your knees slightly bent.
- Start with your arms fully extended, palms facing inwards, and a slight bend in your elbows.
- Slowly pull the dumbbells towards your chest, keeping your elbows close to your sides.
- Pause for a second at the top of the movement, squeezing your shoulder blades together.
- Lower the dumbbells back down to the starting position and repeat for the desired number of reps.
Tips for Maximizing Your Results
To get the most out of the incline DB row, here are a few tips to keep in mind:- Focus on form: Make sure to keep your back straight, and avoid using momentum to pull the weight up.
- Use a weight that's challenging but manageable: You should be able to perform the exercise with proper form, but still feel a burn in your muscles by the end of each set.
- Vary your grip: You can switch up your grip by using a neutral, overhand, or underhand grip to target different areas of your back.
- Incorporate other back exercises: While the incline DB row is one of the most effective back exercises, it's still important to incorporate other exercises like pull-ups, chin-ups, and rows to ensure that you're hitting all areas of your back.
Conclusion
The incline DB row is a highly effective exercise for building a strong and muscular back. By targeting the lats, rhomboids, and traps, it helps to improve posture, reduce the risk of injury, and enhance overall athletic performance. By following the tips outlined in this article, you can maximize your results and take your back training to the next level.Related video of Incline DB Row Muscles Worked: Everything You Need to Know
When it comes to building a well-rounded chest, the incline dumbbell press is one of the most effective exercises you can do. This exercise targets the upper portion of your chest muscles, helping to create that desirable "V" shape. However, the angle of the bench you use for this exercise can have a significant impact on the results you see. In this article, we'll explore the incline dumbbell press bench angle and how it can affect your workout.
What is the Incline Dumbbell Press?
The incline dumbbell press is a variation of the traditional dumbbell press, where you lie on a bench that's angled between 30 and 45 degrees. Unlike the traditional press, the incline press targets the upper portion of your chest, shoulders, and triceps. The exercise involves holding a dumbbell in each hand and pushing them up and away from your chest until your arms are fully extended. The incline press is an excellent exercise for building upper chest mass, which can help create a more defined and aesthetically pleasing chest.
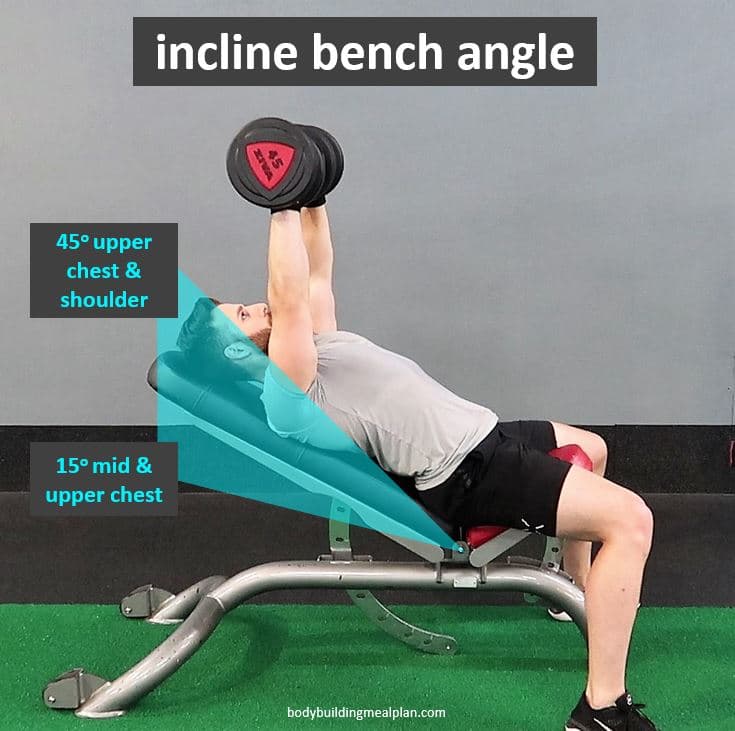
What is the Best Incline Dumbbell Press Bench Angle?

The incline dumbbell press can be performed on a bench that's angled anywhere between 30 and 45 degrees. However, the best angle for you may depend on your individual goals and body type. Generally, a bench that's angled between 30 and 40 degrees is best for targeting the upper chest muscles. However, if you're looking to build mass in your lower chest, a bench that's angled between 15 and 30 degrees may be more effective.
It's important to note that the angle of the bench can also impact the amount of stress placed on your shoulders. A bench that's angled too steeply can put undue stress on your shoulders, potentially leading to injury. Conversely, a bench that's angled too shallowly may not provide enough resistance to effectively target your chest muscles.
How to Perform the Incline Dumbbell Press

Before you start performing the incline dumbbell press, it's important to warm up your chest and shoulders with some light cardio and stretching. Once you're ready to begin, follow these steps:
- Lie on an incline bench with your feet flat on the floor.
- Hold a dumbbell in each hand, with your palms facing forward and your elbows bent at a 90-degree angle.
- Slowly raise the dumbbells up and away from your chest, keeping your elbows slightly bent.
- As you near the top of the movement, fully extend your arms until they're straight.
- Slowly lower the dumbbells back down to your chest, keeping your elbows slightly bent.
- Repeat for the desired number of reps.
It's important to maintain proper form throughout the exercise to avoid injury and maximize results. Keep your back straight, your feet flat on the floor, and your elbows slightly bent throughout the movement.
Variations of the Incline Dumbbell Press

There are several variations of the incline dumbbell press that can help you target different areas of your chest and shoulders. Some popular variations include:
- Incline dumbbell flyes: This exercise involves lying on an inclined bench with your arms extended out to the sides, holding a dumbbell in each hand. Slowly bring your arms together above your chest, then lower them back down to the starting position.
- Close-grip incline dumbbell press: This exercise involves holding the dumbbells close to your body as you press them up and away from your chest.
- One-arm incline dumbbell press: This exercise involves performing the incline press with one arm at a time, alternating between each arm.
By incorporating these variations into your workout, you can target different areas of your chest and shoulders, helping to create a more well-rounded and defined physique.
Conclusion
The incline dumbbell press is an excellent exercise for building upper chest mass and creating a more defined and aesthetically pleasing chest. However, the angle of the bench you use for this exercise can have a significant impact on the results you see. Generally, a bench that's angled between 30 and 40 degrees is best for targeting the upper chest muscles. By maintaining proper form and incorporating variations of the exercise into your workout, you can maximize your results and achieve your fitness goals.
Related video of Incline Dumbbell Press Bench Angle
Internal rotation of the leg is a common condition that occurs when the thigh bone rotates inwardly towards the other leg. This condition can cause pain, discomfort, and difficulty in performing daily activities. In this article, we will discuss the causes, symptoms, and treatment options for internal rotation of the leg.
Causes of Internal Rotation Of Leg

There are several causes of internal rotation of the leg, including:
- Anatomical abnormalities
- Injuries to the hip or knee
- Weak hip muscles
- Poor posture
- Excessive sitting or standing
It is important to identify the underlying cause of internal rotation of the leg to determine the appropriate treatment plan.
Symptoms of Internal Rotation Of Leg
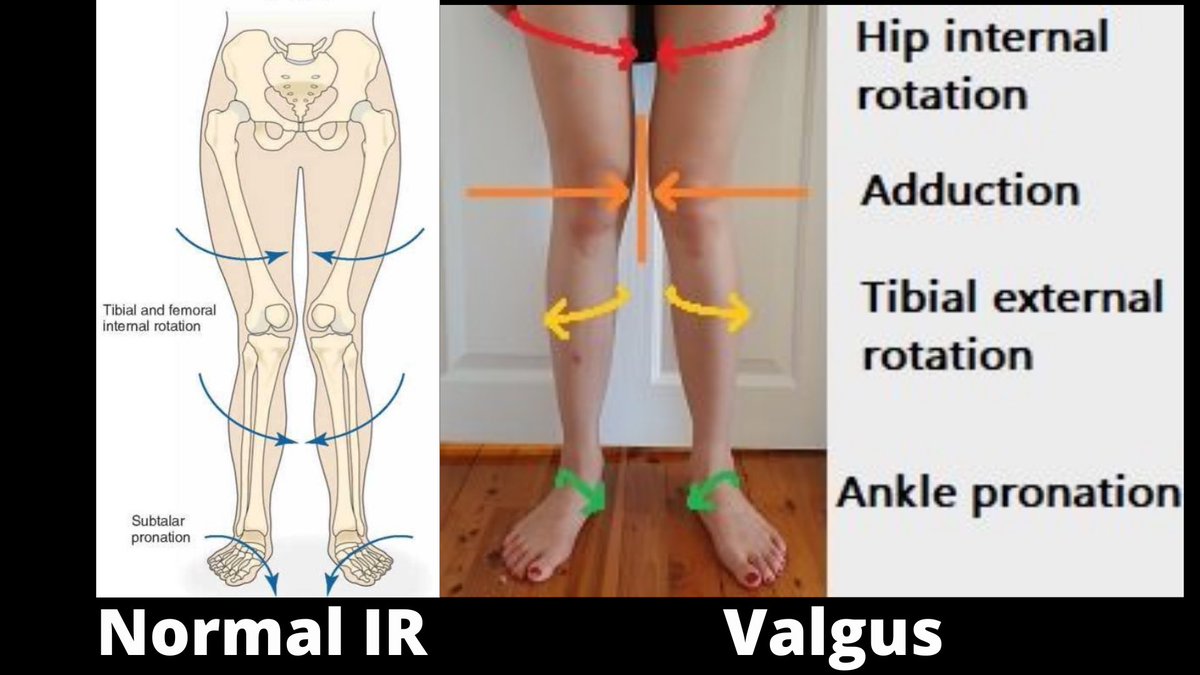
The symptoms of internal rotation of the leg may vary from person to person. Some common symptoms include:
- Pain in the hip, knee, or ankle
- Difficulty walking or standing
- Joint stiffness
- Reduced range of motion
- Muscle weakness
If you experience any of these symptoms, it is important to consult with a healthcare professional for a proper diagnosis and treatment plan.
Treatment Options for Internal Rotation Of Leg

The treatment options for internal rotation of the leg may vary depending on the underlying cause and severity of the condition. Some common treatment options include:
- Physical therapy to improve hip strength and flexibility
- Massage therapy to reduce muscle tension
- Chiropractic adjustments to improve joint alignment
- Medications to reduce pain and inflammation
- Surgery for severe cases or injuries
Your healthcare provider can help determine the best treatment plan for your individual needs.
Prevention of Internal Rotation Of Leg

There are several things you can do to prevent internal rotation of the leg, including:
- Regular exercise to strengthen hip muscles
- Proper posture and body mechanics
- Taking frequent breaks when sitting or standing for long periods of time
- Wearing supportive shoes
- Stretching before and after physical activity
By taking these preventative measures, you can reduce your risk of developing internal rotation of the leg.
Conclusion
Internal rotation of the leg can be a painful and uncomfortable condition, but there are several treatment options available. By identifying the underlying cause and working with a healthcare professional, you can find relief and improve your overall quality of life.
Related video of Internal Rotation Of Leg: Causes, Symptoms, and Treatment

If you're looking to build impressive biceps, the Reverse Ez Bar Curl is a fantastic exercise to incorporate into your workout routine. This exercise targets the brachialis muscle, which helps to give your biceps a fuller and more defined look. In this article, we'll cover everything you need to know about the Reverse Ez Bar Curl, including how to perform it correctly, its benefits and variations, and some tips to help you get the most out of this exercise.
What is the Reverse Ez Bar Curl?
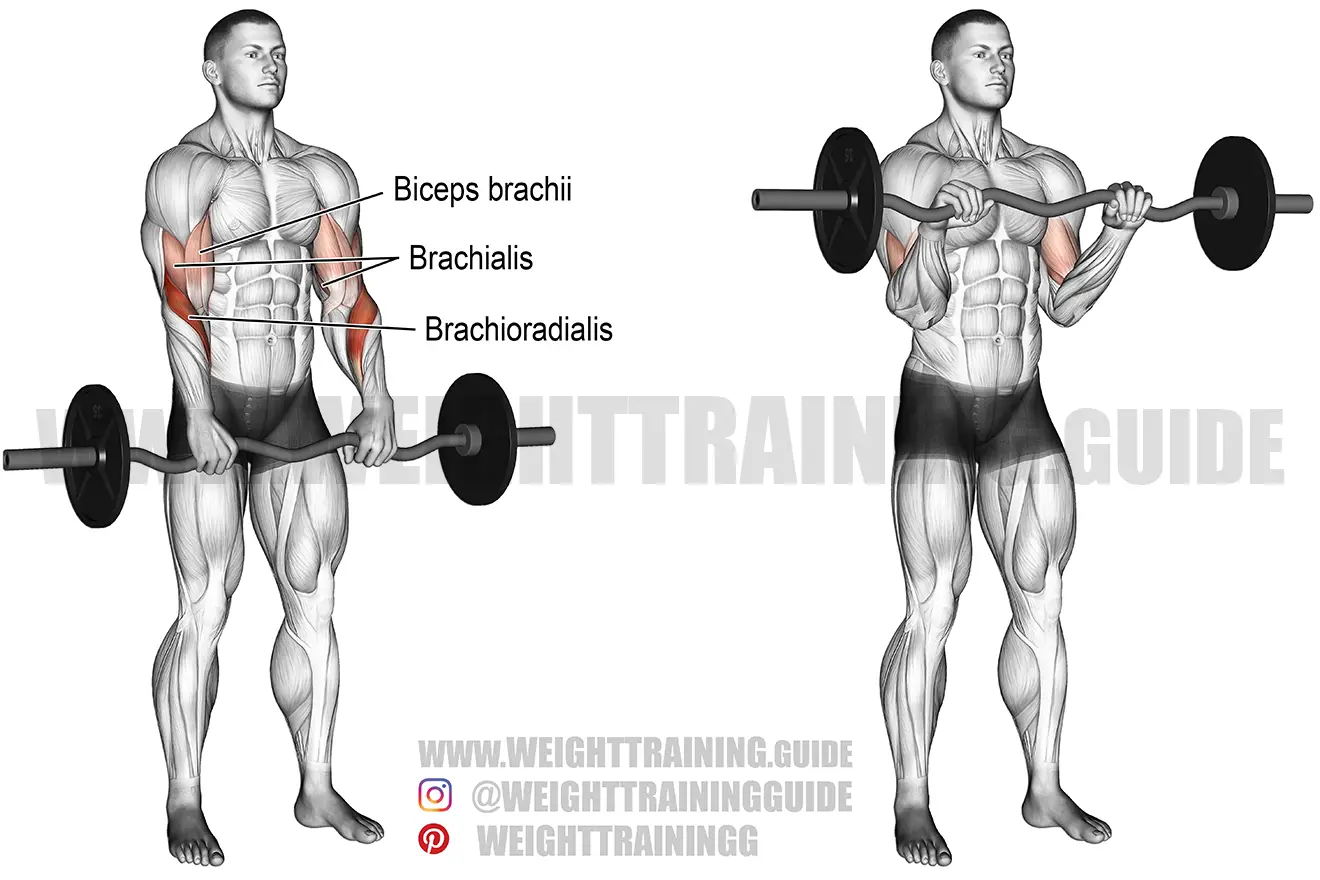
The Reverse Ez Bar Curl is a variation of the traditional bicep curl exercise. Instead of using a straight barbell or dumbbells, you'll use an EZ bar, which is a barbell with a zig-zag shape. You'll also perform the exercise with an underhand grip, which means your palms will be facing downwards. This grip helps to target the brachialis muscle, which is located underneath the biceps muscle.
How to Perform the Reverse Ez Bar Curl
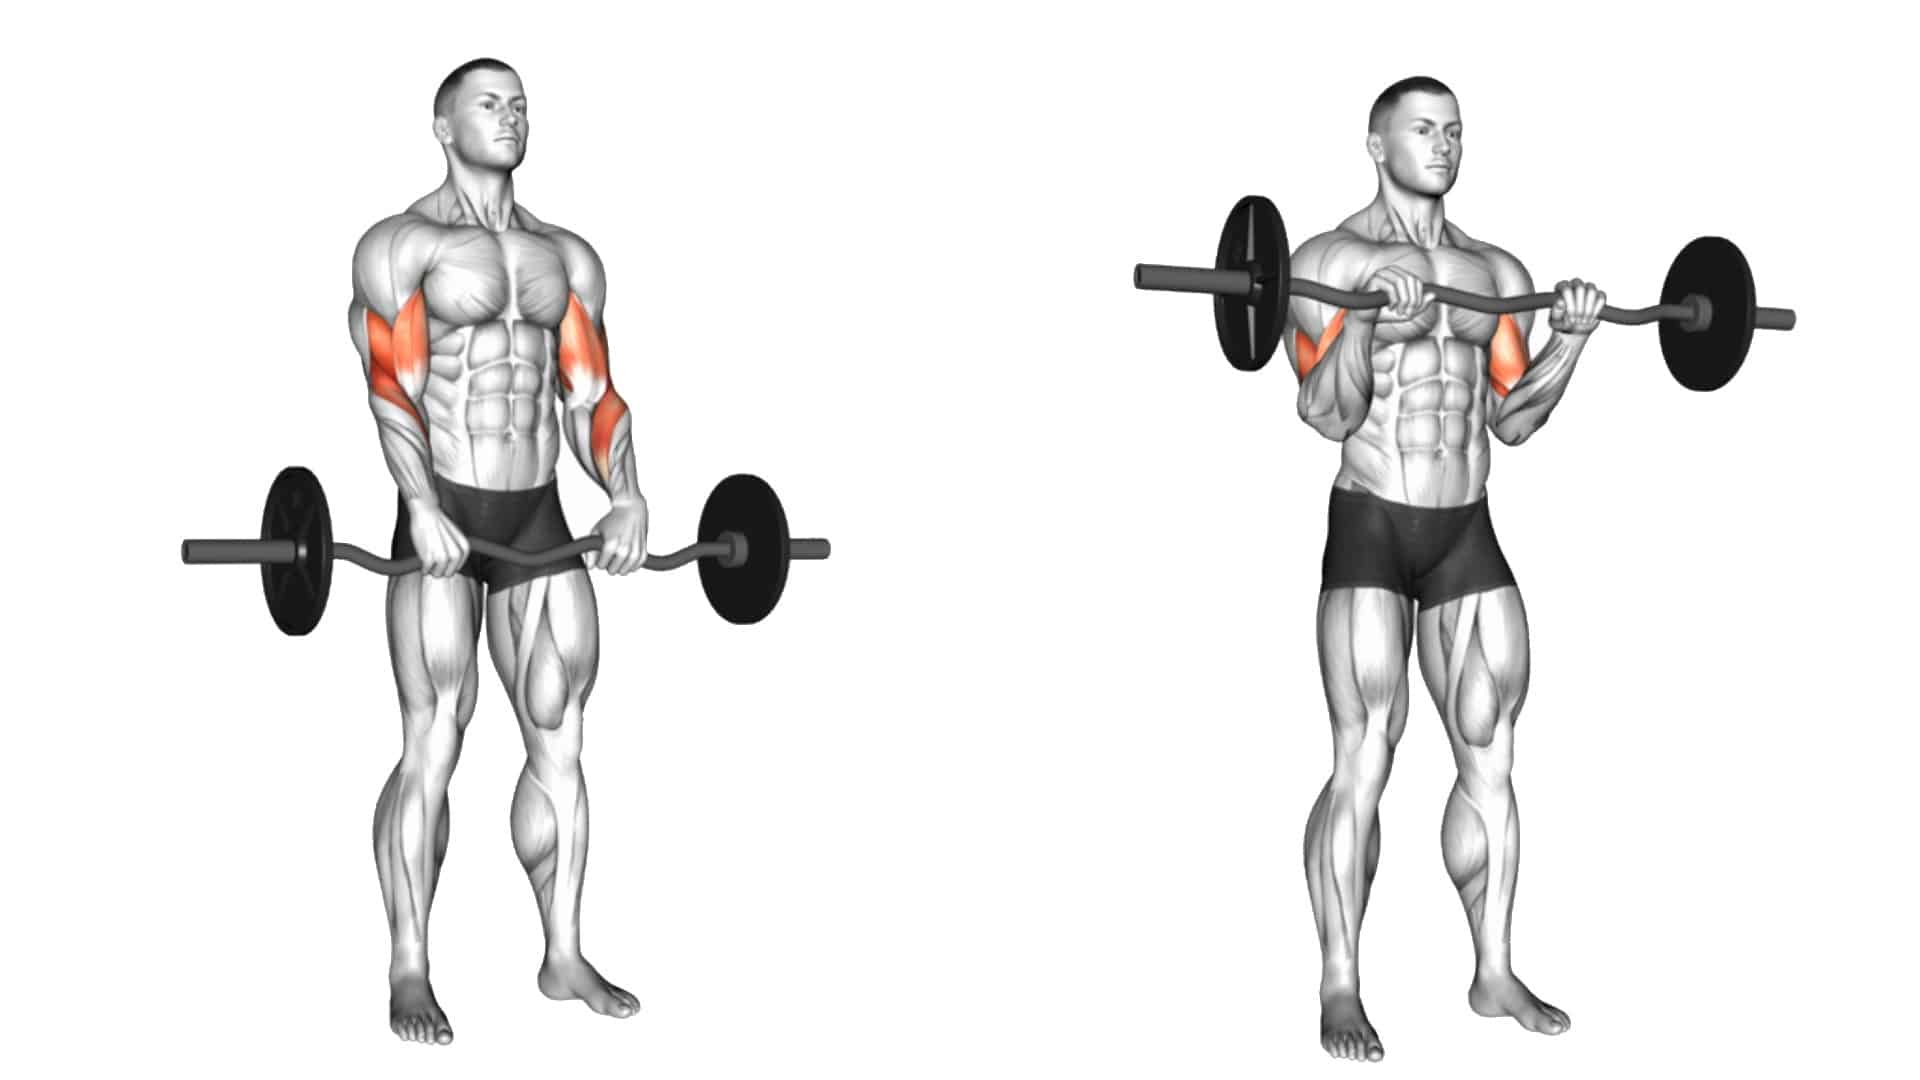
To perform the Reverse Ez Bar Curl, follow these steps:
- Stand with your feet shoulder-width apart and grasp the EZ bar with an underhand grip.
- Hold the bar at arm's length in front of your thighs, with your elbows tucked in close to your sides.
- Curl the bar up towards your chest, keeping your elbows stationary and your wrists straight.
- Pause at the top of the movement, then slowly lower the bar back down to the starting position.
- Repeat for your desired number of reps.
It's important to keep your elbows tucked in close to your sides throughout the exercise to ensure you're targeting the brachialis muscle effectively.
Benefits of the Reverse Ez Bar Curl

The Reverse Ez Bar Curl offers several benefits, including:
- Targeting the brachialis muscle, which helps to give your biceps a fuller and more defined look.
- Reducing the strain on your wrists compared to using a straight barbell.
- Providing a variation to your bicep workout routine.
- Helping to improve your overall grip strength.
Reverse Ez Bar Curl Variations
Here are some variations of the Reverse Ez Bar Curl that you can try:
- Close-grip Reverse Ez Bar Curl: Perform the exercise with your hands closer together on the bar.
- Reverse Ez Bar Preacher Curl: Perform the exercise using a preacher bench.
- Reverse Ez Bar Hammer Curl: Perform the exercise with a neutral grip, which means your palms will be facing each other instead of downwards.
Tips for Performing the Reverse Ez Bar Curl

Here are some tips to help you get the most out of the Reverse Ez Bar Curl:
- Start with a light weight to get the form right, then gradually increase the weight as you become more comfortable with the exercise.
- Keep your elbows tucked in close to your sides throughout the exercise.
- Don't swing the weight or use momentum to lift it.
- Exhale as you curl the weight up, and inhale as you lower it back down.
- Focus on the mind-muscle connection to ensure you're targeting the brachialis muscle effectively.
Conclusion
The Reverse Ez Bar Curl is a fantastic exercise to add to your bicep workout routine. By following the steps outlined in this article, you'll be able to perform the exercise correctly and safely, and reap the many benefits it has to offer. Remember to start with a light weight and focus on good form, and don't hesitate to try out some of the variations we've outlined. With practice, you'll be well on your way to building impressive biceps that will turn heads.