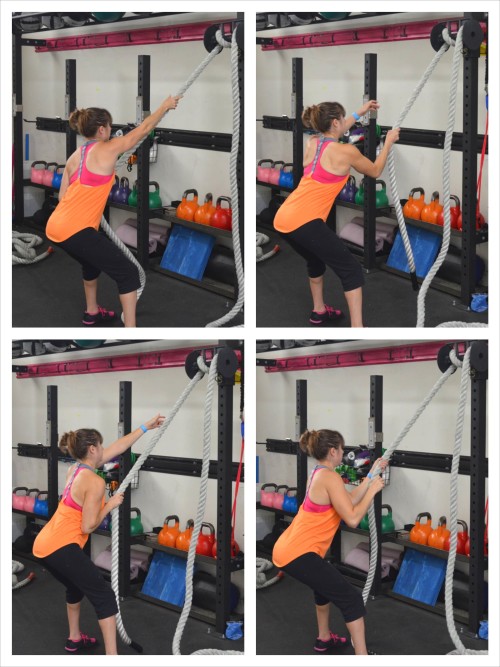
The standing rope pull exercise is a great way to work out your upper body, especially your arms, chest, and back. This exercise is commonly done at the gym, but you can also do it at home if you have the necessary equipment.
Equipment needed

To do this exercise, you will need a rope with handles attached to the ends, and a cable machine or a door anchor. The rope should be long enough so that when you hold the handles with your arms extended in front of you, there is tension on the rope.
How to do the exercise

To do the standing rope pull exercise, follow these steps:
- Attach the rope to the cable machine or door anchor at chest height.
- Stand facing away from the machine or anchor, with your feet shoulder-width apart.
- Hold the rope handles with your arms extended in front of you at shoulder height.
- Take a step back to create tension in the rope.
- Keeping your arms straight, pull the rope towards your chest by squeezing your shoulder blades together.
- Pause for a second, then slowly release the rope back to starting position.
- Repeat for the desired number of repetitions.
You can vary the exercise by changing the angle of your body or the height of the anchor point. For example, to work out your upper back muscles, you can stand with your feet wider apart and pull the rope towards your chin instead of your chest.
Tips for beginners
If you are new to this exercise, start with a lighter weight to avoid straining your muscles. It is also important to maintain good posture throughout the exercise – keep your back straight and your shoulders down. Breathe in as you pull the rope towards you, and exhale as you release it.
Benefits of the standing rope pull exercise

The standing rope pull exercise has several benefits, including:
- Building upper body strength and endurance
- Improving posture and balance
- Reducing the risk of back pain and injury
- Involving multiple muscle groups, including the biceps, triceps, chest, back, and shoulders
- Burning calories and fat
Conclusion
The standing rope pull exercise is a versatile and effective way to work out your upper body. By using proper form and gradually increasing the weight, you can build strength, improve posture, and reduce the risk of injury. Give it a try and see how it can benefit you!
Related video of Standing Rope Pull Exercise

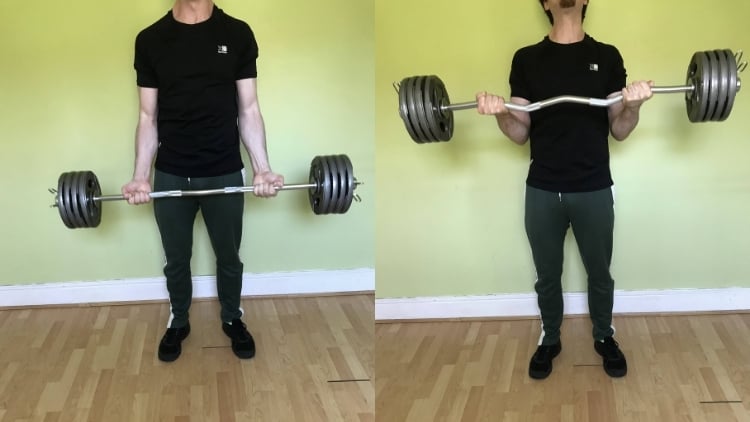
If you are looking to build bigger biceps, the Wide Grip Ez Bar Curl is one of the most effective exercises you can do. This exercise targets the biceps brachii, the muscle responsible for flexing the elbow joint and rotating the forearm. By performing this exercise regularly, you can achieve bigger and stronger biceps.
How to Perform the Wide Grip Ez Bar Curl

To perform the Wide Grip Ez Bar Curl, follow these steps:
- Stand with your feet shoulder-width apart and your knees slightly bent.
- Hold the Ez bar with an overhand grip, with your hands positioned wider than shoulder-width apart.
- Keep your elbows close to your body and your upper arms stationary as you curl the bar up towards your shoulders.
- Squeeze your biceps at the top of the movement, then slowly lower the bar back down to the starting position.
- Repeat for the desired number of reps.
It is important to use proper form when performing the Wide Grip Ez Bar Curl to avoid injury and maximize results. Keep your back straight, engage your core, and avoid swinging or using momentum to lift the bar.
Variations of the Wide Grip Ez Bar Curl
There are several variations of the Wide Grip Ez Bar Curl that you can try to mix up your bicep workout:
- Narrow grip Ez bar curl: Perform the exercise with your hands positioned closer together on the bar.
- Reverse grip Ez bar curl: Hold the bar with an underhand grip, which targets the brachialis muscle in addition to the biceps.
- Preacher curl: Perform the exercise on a preacher bench to isolate the biceps and reduce the involvement of other muscles.
Benefits of the Wide Grip Ez Bar Curl

The Wide Grip Ez Bar Curl offers several benefits for anyone looking to build bigger biceps:
- Increased bicep size: By targeting the biceps brachii, this exercise can help increase the size and strength of your biceps.
- Improved bicep definition: The Wide Grip Ez Bar Curl can help shape and define your biceps, giving them a more aesthetic appearance.
- Reduced risk of injury: Strengthening your biceps can help improve your overall upper body strength and reduce your risk of injury.
- Improved grip strength: Holding the Ez bar with a wider grip can help improve your grip strength, which can be beneficial for other exercises.
How to Incorporate the Wide Grip Ez Bar Curl into Your Workout
The Wide Grip Ez Bar Curl can be incorporated into your bicep workout in several ways:
- Perform the exercise as part of a full-body workout, targeting your biceps after completing other upper body exercises.
- Include the exercise as part of a dedicated bicep workout, performing multiple sets with varying grips and weights.
- Superset the Wide Grip Ez Bar Curl with another bicep exercise to increase intensity and challenge your muscles.
Conclusion
The Wide Grip Ez Bar Curl is a highly effective exercise for building bigger and stronger biceps. By incorporating this exercise into your workout routine and following proper form, you can achieve noticeable results in a relatively short amount of time. Try out different variations of the exercise to keep your bicep workout challenging and fun.
Related video of Wide Grip Ez Bar Curl: The Ultimate Guide to Bigger Biceps

Introduction
If you're looking for an effective lower body exercise that can help you build strength, power, and muscle mass, then you might want to give the 1 legged hip thrust a try. This single-leg variation of the hip thrust is a challenging and rewarding exercise that targets your glutes, hamstrings, and lower back. In this article, we'll take a closer look at the 1 legged hip thrust and provide you with a step-by-step guide on how to perform it correctly.Benefits of the 1 Legged Hip Thrust
The 1 legged hip thrust is an isolation exercise that can help you develop better hip extension, which is essential for running, jumping, and other athletic movements. By focusing on one leg at a time, you can also improve your balance, stability, and coordination. Additionally, the 1 legged hip thrust is a great exercise for building a strong and shapely butt, which is a common goal for many fitness enthusiasts.
How to Perform the 1 Legged Hip Thrust
To perform the 1 legged hip thrust, you'll need a bench or sturdy elevated surface, such as a step or box. Here's a step-by-step guide on how to do it:1. Sit on the floor with your back against the bench and your legs extended in front of you.2. Place one foot on the bench with your knee bent and your heel close to your buttocks.3. Extend your other leg straight out in front of you.4. Place your hands on your hips or on the floor beside you.5. Drive your foot into the bench and lift your hips up towards the ceiling.6. Squeeze your glutes at the top of the movement.7. Lower your hips back down to the floor.8. Repeat for the desired number of reps.9. Switch legs and repeat.Common Mistakes to Avoid
Like any exercise, the 1 legged hip thrust can be done incorrectly if you're not careful. Here are some common mistakes to avoid:- Arching your back: Keep your spine neutral throughout the movement and avoid hyperextending your lower back.- Allowing your knee to cave in: Keep your knee in line with your toes and avoid letting it collapse inward.- Not squeezing your glutes: Make sure to contract your glutes at the top of the movement to fully activate your muscles.- Using momentum: Avoid using your upper body to lift your hips and focus on using your glutes and hamstrings instead.
Variations of the 1 Legged Hip Thrust
Once you've mastered the basic 1 legged hip thrust, you can try some variations to make the exercise more challenging or to target different areas of your lower body. Here are some ideas:- Weighted 1 legged hip thrust: Hold a dumbbell or barbell on your hips to add resistance.- Single-leg glute bridge: This exercise is similar to the 1 legged hip thrust, but you keep your foot flat on the floor instead of placing it on a bench.- Bulgarian split squat: This exercise is a compound movement that works your glutes, quads, and hamstrings.
Conclusion
The 1 legged hip thrust is a challenging and effective exercise that can help you build lower body strength, power, and muscle mass. By following the steps outlined in this article, you can perform the exercise correctly and avoid common mistakes. Remember to start with a light weight and gradually increase the resistance as you get stronger. With consistent training, you can achieve a strong and shapely butt that will turn heads at the gym.Related video of 1 Legged Hip Thrust: A Comprehensive Guide

Close grip chin ups are a type of exercise that targets the upper body muscles, specifically the biceps, back, and shoulders. This exercise is a variation of the traditional chin up, which involves a wider grip on the bar. Close grip chin ups are performed with a narrow grip, which can increase the difficulty of the exercise and provide additional benefits.
Benefits of Close Grip Chin Ups

Close grip chin ups offer several benefits, including:
- Increased bicep activation: The close grip targets the biceps more effectively than wider grip chin ups.
- Improved back strength: This exercise targets the lats and other back muscles, which can improve overall back strength and posture.
- Enhanced shoulder stability: Close grip chin ups require greater shoulder stability, which can help prevent injury and improve overall shoulder health.
- Increased core strength: The core muscles are activated during close grip chin ups, which can improve overall core strength and stability.
How to Perform Close Grip Chin Ups

To perform close grip chin ups:
- Start by hanging from a chin up bar with your palms facing towards you and your hands shoulder-width apart.
- Squeeze your shoulder blades together and pull your body up towards the bar, keeping your elbows close to your body.
- Pause at the top of the movement and then slowly lower your body back down to the starting position.
- Repeat for the desired number of repetitions.
It is important to maintain proper form throughout the exercise to prevent injury and maximize the benefits. Keep your core engaged and avoid swinging or using momentum to complete the movement.
Variations of Close Grip Chin Ups

There are several variations of close grip chin ups that can be used to add variety to your workout and target different muscle groups. Some variations include:
- Weighted close grip chin ups: This involves adding weight to the exercise using a weight belt or dumbbell between your feet.
- Negative close grip chin ups: This involves focusing on the eccentric (lowering) portion of the movement to build strength.
- Assisted close grip chin ups: This involves using a resistance band or machine to assist with the movement if you are not yet able to perform an unassisted chin up.
Conclusion
Close grip chin ups are a challenging and effective exercise that can help improve upper body strength and stability. By incorporating this exercise into your workout routine and using variations to keep things interesting, you can target different muscle groups and continue to see progress over time.
Related video of Close Grip Chin Ups
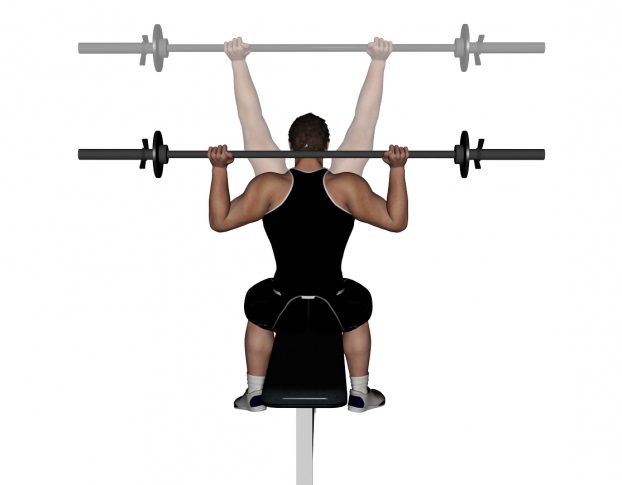
When it comes to building strong and well-defined shoulders, there are many exercises that can help. One of these exercises is the behind the neck shoulder press, which targets the shoulders, triceps, and upper back muscles. This exercise is often performed with a barbell, but it can also be done with dumbbells or a machine.
Benefits of Behind The Neck Shoulder Press
The behind the neck shoulder press is an effective exercise for building shoulder strength and size. Here are some of the benefits of this exercise:
- Targets multiple muscle groups: This exercise targets the shoulders, triceps, and upper back muscles, making it a great compound exercise.
- Increases range of motion: Performing the behind the neck shoulder press can help increase your shoulder mobility and flexibility.
- Builds shoulder strength: This exercise can help build overall shoulder strength, which can improve your performance in other exercises.
- Improves posture: Strengthening the upper back muscles can improve your posture and reduce the risk of shoulder injuries.
Technique for Behind The Neck Shoulder Press
Performing the behind the neck shoulder press requires proper technique to avoid injury and get the most out of the exercise. Here are the steps to perform the behind the neck shoulder press:
- Start by standing with your feet shoulder-width apart and holding the barbell behind your neck with a wide grip.
- Engage your core and glutes, and press the weight up overhead until your arms are fully extended.
- Lower the weight back down behind your neck with control, and repeat for the desired number of reps.
It's important to keep your elbows pointing out to the sides and avoid letting them flare out in front of your body. Additionally, avoid arching your back or using momentum to lift the weight.

Safety Tips for Behind The Neck Shoulder Press
While the behind the neck shoulder press can be a beneficial exercise, there are some safety tips to keep in mind to avoid injury:
- Start with a lighter weight: If you're new to this exercise, start with a lighter weight to focus on proper form and avoid injury.
- Warm up properly: It's important to warm up your shoulders and upper back before performing this exercise to prevent injury.
- Don't push through pain: If you experience any pain or discomfort during the exercise, stop immediately and seek medical attention if necessary.
- Choose the right equipment: If you have shoulder or neck issues, it may be best to avoid this exercise or choose a machine or dumbbell variation instead of a barbell.
Variations of Behind The Neck Shoulder Press
There are several variations of the behind the neck shoulder press that can be done to target different muscle groups or accommodate different equipment. Here are some variations to consider:
- Dumbbell behind the neck shoulder press: This variation is performed with dumbbells instead of a barbell, which can allow for a greater range of motion and more shoulder stability.
- Machine behind the neck shoulder press: Using a machine can provide added support and stability, making it a good option for those with shoulder or neck issues.
- Seated behind the neck shoulder press: This variation is performed while seated, which can provide added stability and reduce the risk of injury.

Conclusion
The behind the neck shoulder press is a great exercise for building shoulder strength and size, but it's important to use proper technique and follow safety tips to avoid injury. Additionally, there are several variations of this exercise that can be done to target different muscle groups or accommodate different equipment.
Related video of Behind The Neck Shoulder Press: Benefits, Technique, and Safety Tips

Forearm curls behind back is an exercise that targets the forearm muscles, particularly the brachioradialis. This exercise is done by holding a weight behind your back and curling your forearms towards your biceps. It may seem simple, but it is a challenging exercise that requires proper form to avoid injuries and maximize its benefits.
How to Do Forearm Curls Behind Back

Here are the steps to properly do forearm curls behind back:
- Stand up straight with your feet shoulder-width apart and your arms relaxed at your sides.
- Hold a weight in one hand behind your back with your palm facing away from your body.
- Slowly curl your forearm towards your biceps while keeping your upper arms still.
- Pause for a second at the top of the movement and then slowly lower the weight back to the starting position.
- Repeat for the desired number of repetitions and then switch to the other arm.
It is essential to keep your upper arms still throughout the exercise and only move your forearms. Also, avoid swinging the weight or using momentum to lift it. Use a weight that is challenging but still allows you to maintain proper form.
Benefits of Forearm Curls Behind Back

Forearm curls behind back offers several benefits, including:
- Increased Forearm Strength: This exercise targets the forearm muscles, which can help you improve your grip strength and perform daily activities that require forearm strength.
- Better Arm Definition: Forearm curls behind back can help you develop more defined and toned arms.
- Injury Prevention: Strong forearm muscles can help prevent injuries to your wrists, elbows, and shoulders by providing support and stability.
- Improved Sports Performance: Many sports require forearm strength, such as golf, tennis, and rock climbing. Forearm curls behind back can help you improve your performance in these sports.
- Increased Muscle Endurance: Forearm curls behind back can help improve your muscle endurance, allowing you to perform daily activities with less fatigue.
Overall, forearm curls behind back is a simple yet effective exercise that can help you improve your forearm strength, arm definition, and sports performance. It is also an excellent exercise for injury prevention and muscle endurance.
Conclusion
Forearm curls behind back is an exercise that targets the forearm muscles and offers several benefits, including increased forearm strength, better arm definition, injury prevention, improved sports performance, and increased muscle endurance. To maximize its benefits, it is essential to perform the exercise with proper form and use a weight that is challenging but still allows you to maintain proper form. Add forearm curls behind back to your workout routine and see the results for yourself!
Related video of Forearm Curls Behind Back: How to Do It Properly and Its Benefits

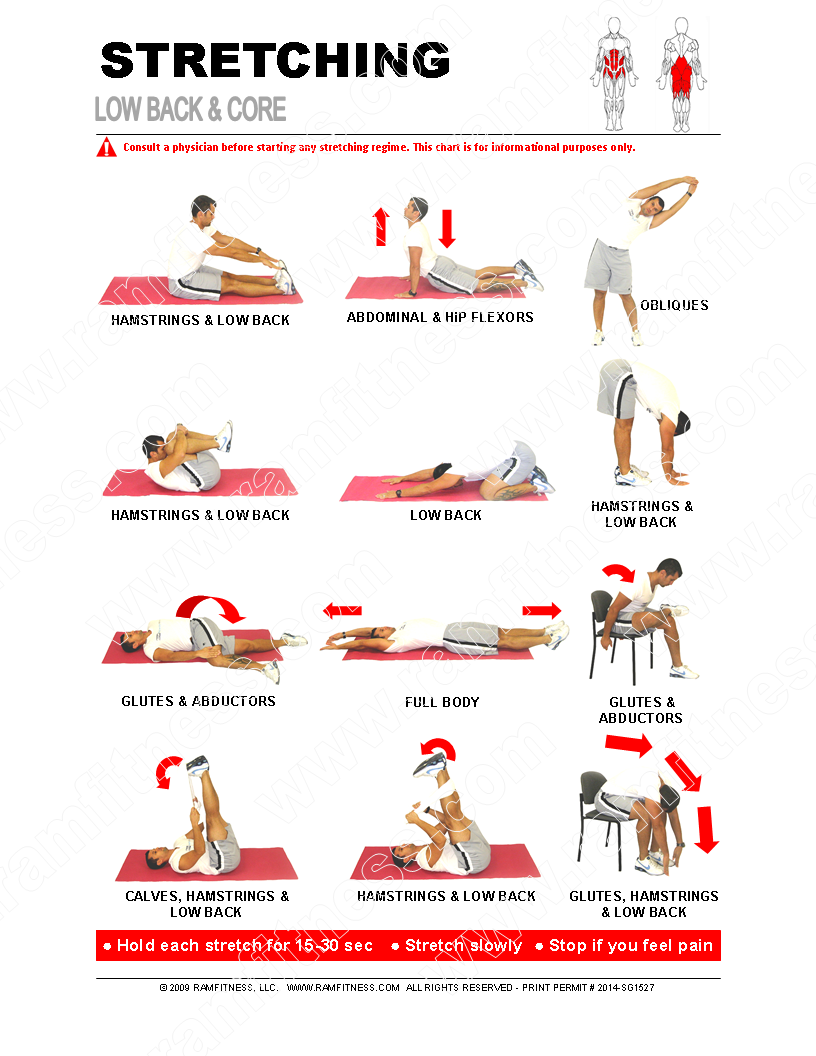
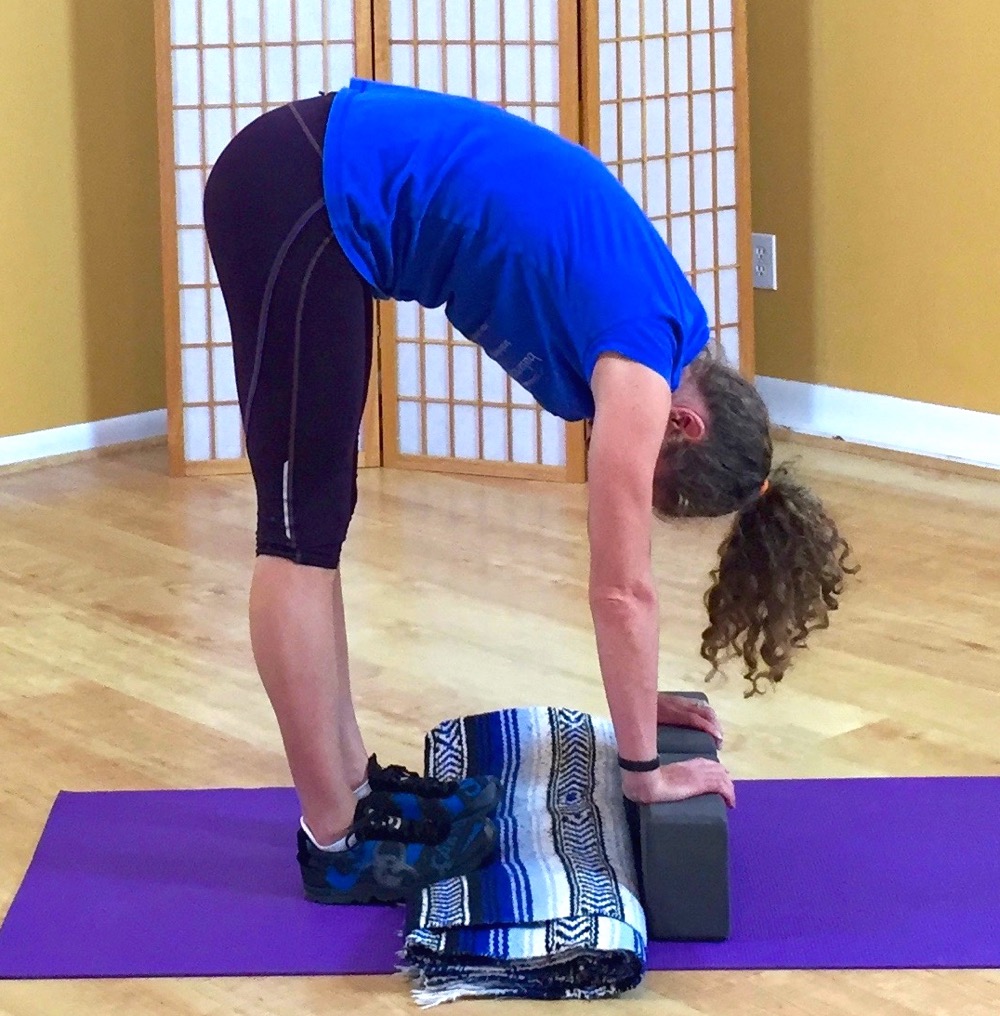
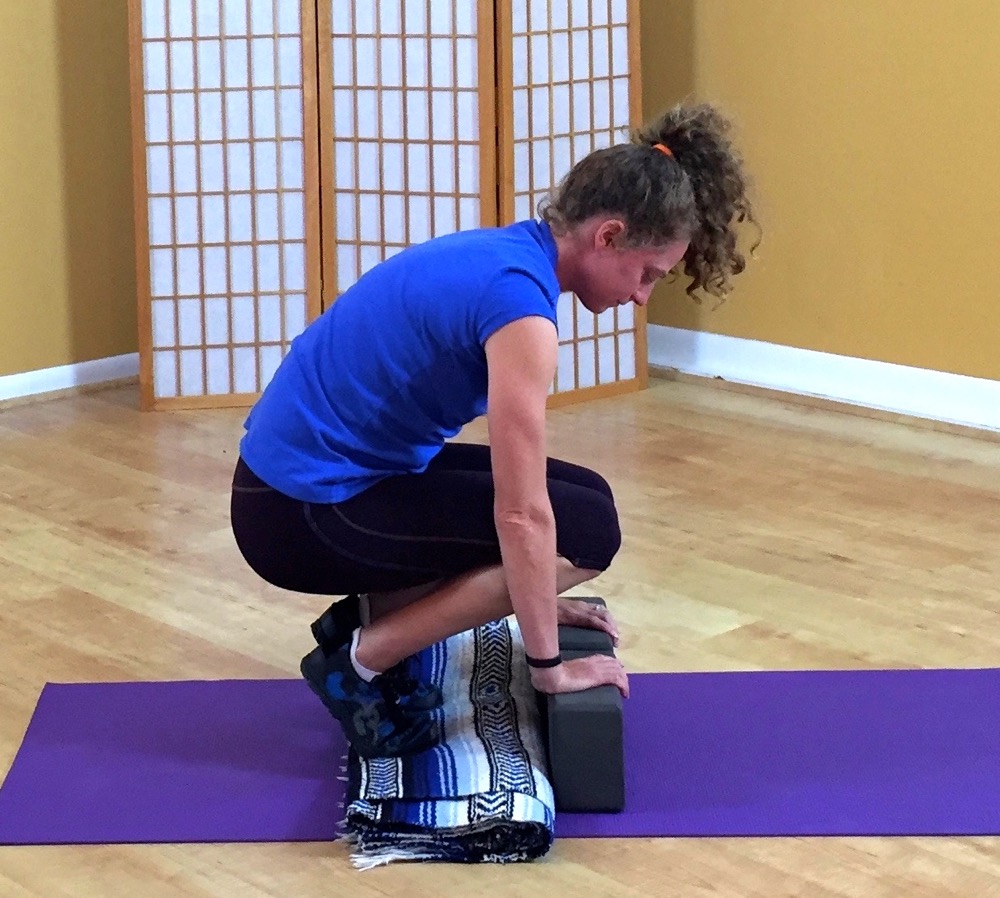
If you're looking to improve your overall fitness, focusing on your core is essential. Your core muscles are responsible for stabilizing your body during movement, and they play a crucial role in maintaining good posture. By stretching your core muscles regularly, you can improve your flexibility, reduce your risk of injury, and enhance your overall physical performance.
What is the Core?
Your core encompasses all the muscles in your torso, including your abdominals, back muscles, and pelvic muscles. These muscles work together to provide stability and support to your spine and pelvis, allowing you to perform everyday activities with ease.
Why is Core Stretching Important?

Stretching your core muscles can help to improve your flexibility and range of motion, which can reduce your risk of injury during physical activity. It can also help to relieve tension in your back and neck, which can lead to improved posture and reduced pain. Additionally, stretching your core can improve your overall physical performance, making it easier to perform everyday activities and enjoy your favorite sports and hobbies.
How to Stretch Your Core
There are many different ways to stretch your core muscles, including the following:
1. Cat-Cow Stretch
To perform the cat-cow stretch, start on your hands and knees with your wrists directly under your shoulders and your knees directly under your hips. Inhale as you arch your back and lift your head and tailbone toward the ceiling (cow pose). Exhale as you round your spine and tuck your chin to your chest (cat pose). Repeat for several breaths, moving fluidly between the two poses.
2. Cobra Stretch

To perform the cobra stretch, lie on your stomach with your hands under your shoulders and your elbows close to your sides. Press into your hands and lift your chest off the ground, keeping your shoulders relaxed and your elbows close to your sides. Hold for several breaths, then release.
3. Child's Pose Stretch

To perform the child's pose stretch, start on your hands and knees with your wrists directly under your shoulders and your knees directly under your hips. Lower your hips back toward your heels and stretch your arms out in front of you. Rest your forehead on the ground and hold for several breaths.
4. Seated Twist Stretch

To perform the seated twist stretch, sit on the ground with your legs extended in front of you. Bend your right knee and place your right foot on the ground outside your left thigh. Place your left elbow on the outside of your right knee and gently twist to the right. Hold for several breaths, then repeat on the other side.
When to Stretch Your Core

It's important to stretch your core muscles regularly, ideally after a warm-up and before a cool down. You can also incorporate core stretches into your daily routine, such as when you first wake up or before you go to bed.
Conclusion
Stretching your core muscles is essential for improving your overall fitness and reducing your risk of injury. By incorporating these simple stretches into your daily routine, you can improve your flexibility and range of motion, enhance your physical performance, and enjoy a healthier, more active lifestyle.
Related video of How to Stretch Your Core for Improved Flexibility and Strength

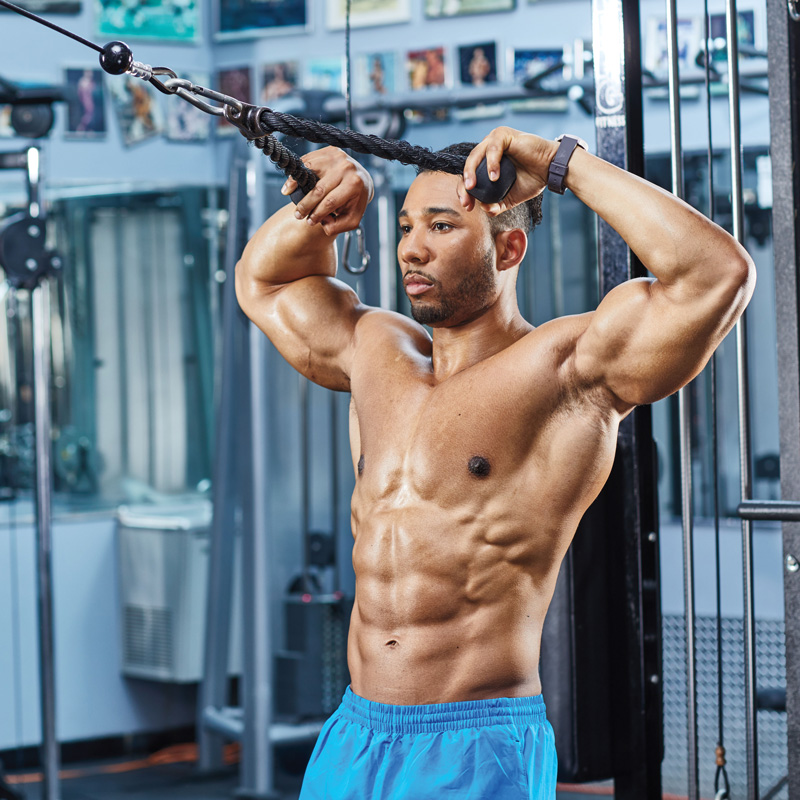
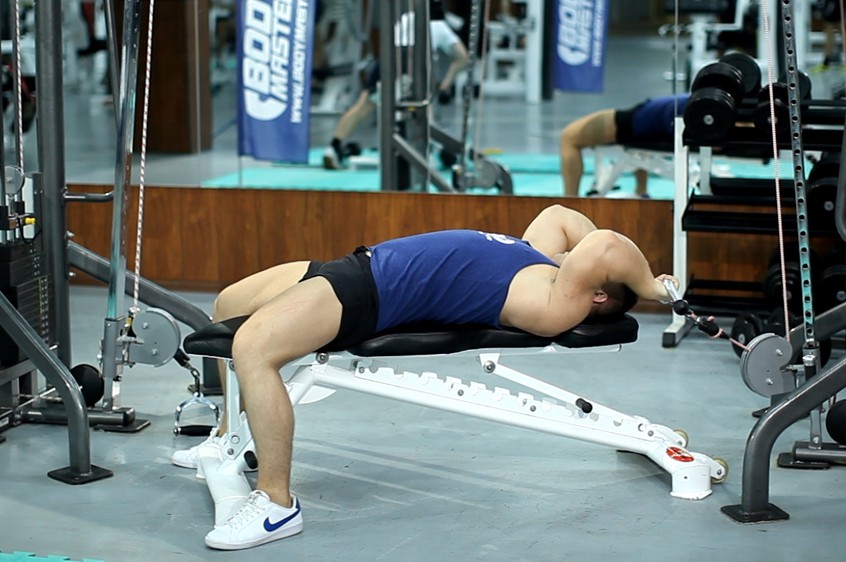
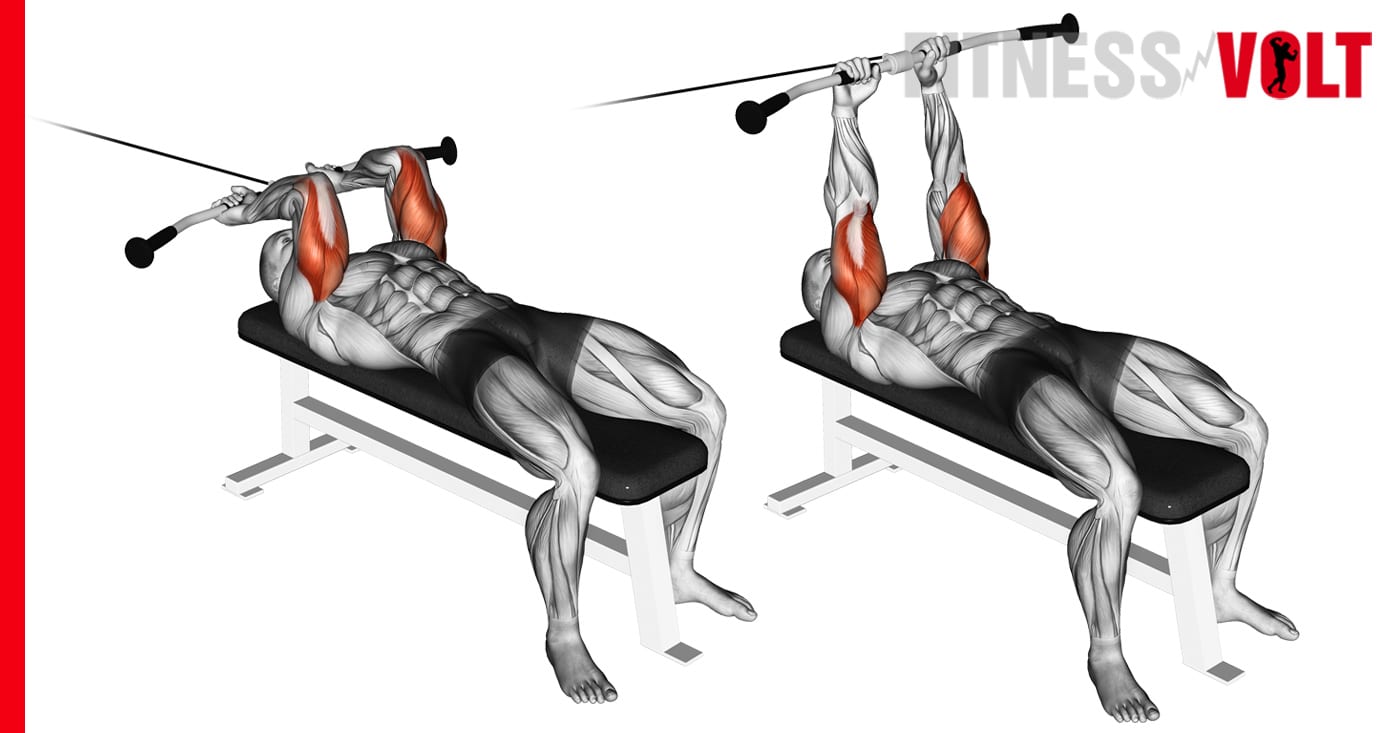
The Cable Lying Triceps Extension, also known as the cable skull crusher or cable triceps pushdown, is a popular exercise for building stronger and more defined triceps muscles. This exercise is commonly performed in the gym using a cable machine with a bar attachment, but can also be done at home with resistance bands.
Benefits of Cable Lying Triceps Extension
The Cable Lying Triceps Extension is a great exercise for targeting the triceps muscles, which are responsible for extending the elbow joint. Here are some of the benefits of this exercise:
- Increases triceps strength and size
- Improves overall upper body strength
- Can help prevent elbow injuries
- Allows for a greater range of motion compared to traditional triceps exercises
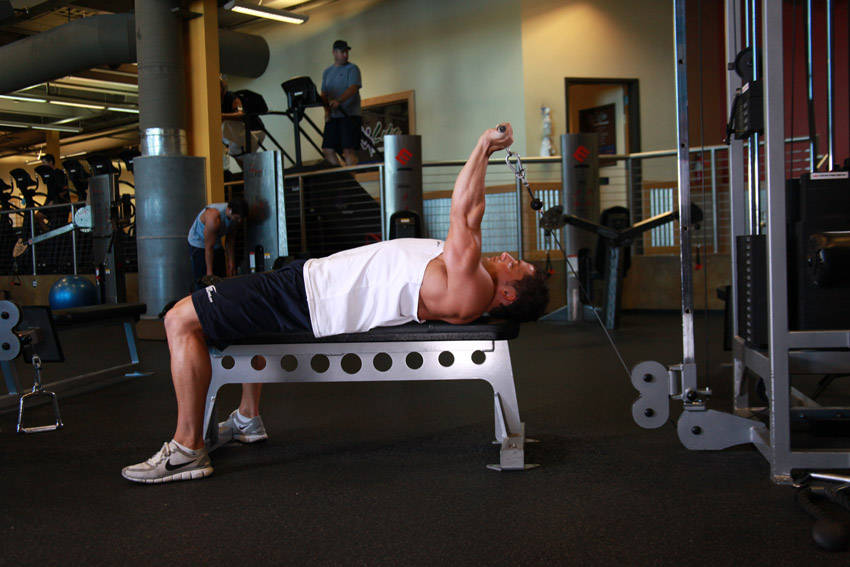
How to Perform Cable Lying Triceps Extension
To perform the Cable Lying Triceps Extension, follow these steps:
- Lie flat on a bench with your feet planted firmly on the ground.
- Grasp the cable attachment with an overhand grip and position your arms straight up over your chest.
- Slowly lower the cable attachment towards your forehead, keeping your elbows stationary and close to your head.
- Pause at the bottom of the movement, then slowly raise the cable attachment back to the starting position.
- Repeat for desired number of reps.
For a more challenging variation, you can perform the exercise with one arm at a time or use heavier weights.
Tips for Cable Lying Triceps Extension
Here are some tips to help you get the most out of Cable Lying Triceps Extension:
- Use a weight that allows you to maintain proper form throughout the exercise.
- Keep your elbows stationary and close to your head throughout the movement.
- Exhale as you extend your arms and inhale as you lower the weight.
- Perform the exercise slowly and with control.
- Stretch your triceps after the exercise to prevent muscle soreness and tightness.
Cable Lying Triceps Extension vs. Skull Crusher
The Cable Lying Triceps Extension is often compared to the Skull Crusher exercise, as both target the triceps muscles. However, there are some key differences between the two exercises:
- The Skull Crusher is typically performed lying on a bench with dumbbells or a barbell, while the Cable Lying Triceps Extension is done using a cable machine.
- The Cable Lying Triceps Extension allows for a greater range of motion, as the cable can be positioned at different angles and heights.
- The Skull Crusher places more stress on the elbows, which can be problematic for those with joint pain or injuries.

Conclusion
The Cable Lying Triceps Extension is a versatile and effective exercise for building stronger and more defined triceps muscles. By following proper form and technique, you can safely perform this exercise and reap its many benefits. Incorporate Cable Lying Triceps Extension into your upper body workout routine and watch your triceps muscles grow stronger and bigger.
Related video of Cable Lying Triceps Extension: A Complete Guide

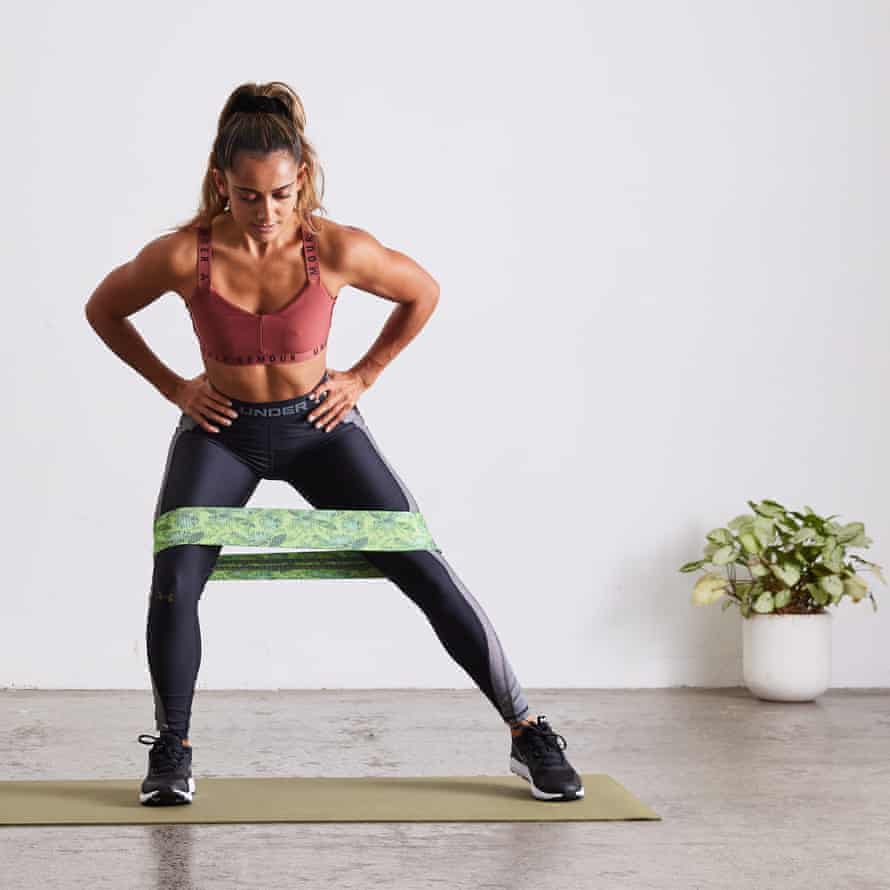
Walking is one of the simplest yet most effective forms of exercise. Adding a resistance band around your thighs can make your walks even more challenging and beneficial. Here's everything you need to know about walking with resistance band around thighs:
What are Resistance Bands?

Resistance bands are elastic bands that come in various sizes, thicknesses, and resistance levels. They are widely used in strength training exercises to add resistance and intensity to workouts.
Benefits of Walking with Resistance Bands Around Thighs

Walking with a resistance band around your thighs can enhance the benefits of walking. Here are some of the benefits:
- Increases muscle activation in the glutes, hamstrings, and quadriceps
- Improves balance and stability
- Increases heart rate and burns more calories
- Helps to tone and shape the thighs
- Increases overall strength and endurance
How to Walk with Resistance Bands Around Thighs

Walking with resistance bands around your thighs is easy and straightforward. Follow these steps:
- Put on the resistance band around your thighs, just above your knees.
- Stand with your feet shoulder-width apart and your toes pointing forward.
- Engage your core, keep your back straight, and look straight ahead.
- Start walking at a moderate pace, swinging your arms naturally.
- Keep tension on the resistance band by pushing your knees outwards as you walk.
- Walk for at least 30 minutes, gradually increasing the pace and duration as you progress.
Tips for Walking with Resistance Bands Around Thighs
To get the most out of your walking with resistance bands around thighs, here are some tips to follow:
- Choose the right resistance band that suits your fitness level and goals.
- Start with a lighter resistance band and gradually increase the resistance as you get stronger.
- Keep your knees slightly bent and your weight evenly distributed on both feet.
- Avoid leaning forward or backward, and maintain good posture throughout the walk.
- Breathe deeply and rhythmically to supply oxygen to your muscles.
- Warm up before and cool down after your walk with some stretching exercises.
Precautions and Contraindications

While walking with resistance bands around thighs is generally safe and beneficial, it may not be suitable for everyone. Here are some precautions and contraindications to consider:
- If you have knee, hip, or back problems, consult your doctor before starting this exercise.
- If you feel any pain or discomfort during the walk, stop immediately and rest.
- Do not overdo it, and listen to your body's signals.
- Do not use resistance bands that are too tight or too loose.
Conclusion
Walking with resistance bands around thighs is a simple yet effective way to enhance your walking workout. By adding resistance and intensity to your walk, you can target your lower body muscles, improve your balance and stability, and burn more calories. Follow the tips and precautions mentioned above, and enjoy the benefits of this exercise.
Related video ofWalking With Resistance Band Around Thighs

Barbell deadlift is one of the most effective exercises for building strength and muscle mass in the lower body. It targets multiple muscle groups, including the glutes, hamstrings, quads, and lower back. It also helps improve overall athletic performance and posture. However, it's essential to use proper form and technique to avoid injury and maximize the benefits of this exercise.
Step 1: Set Up The Barbell
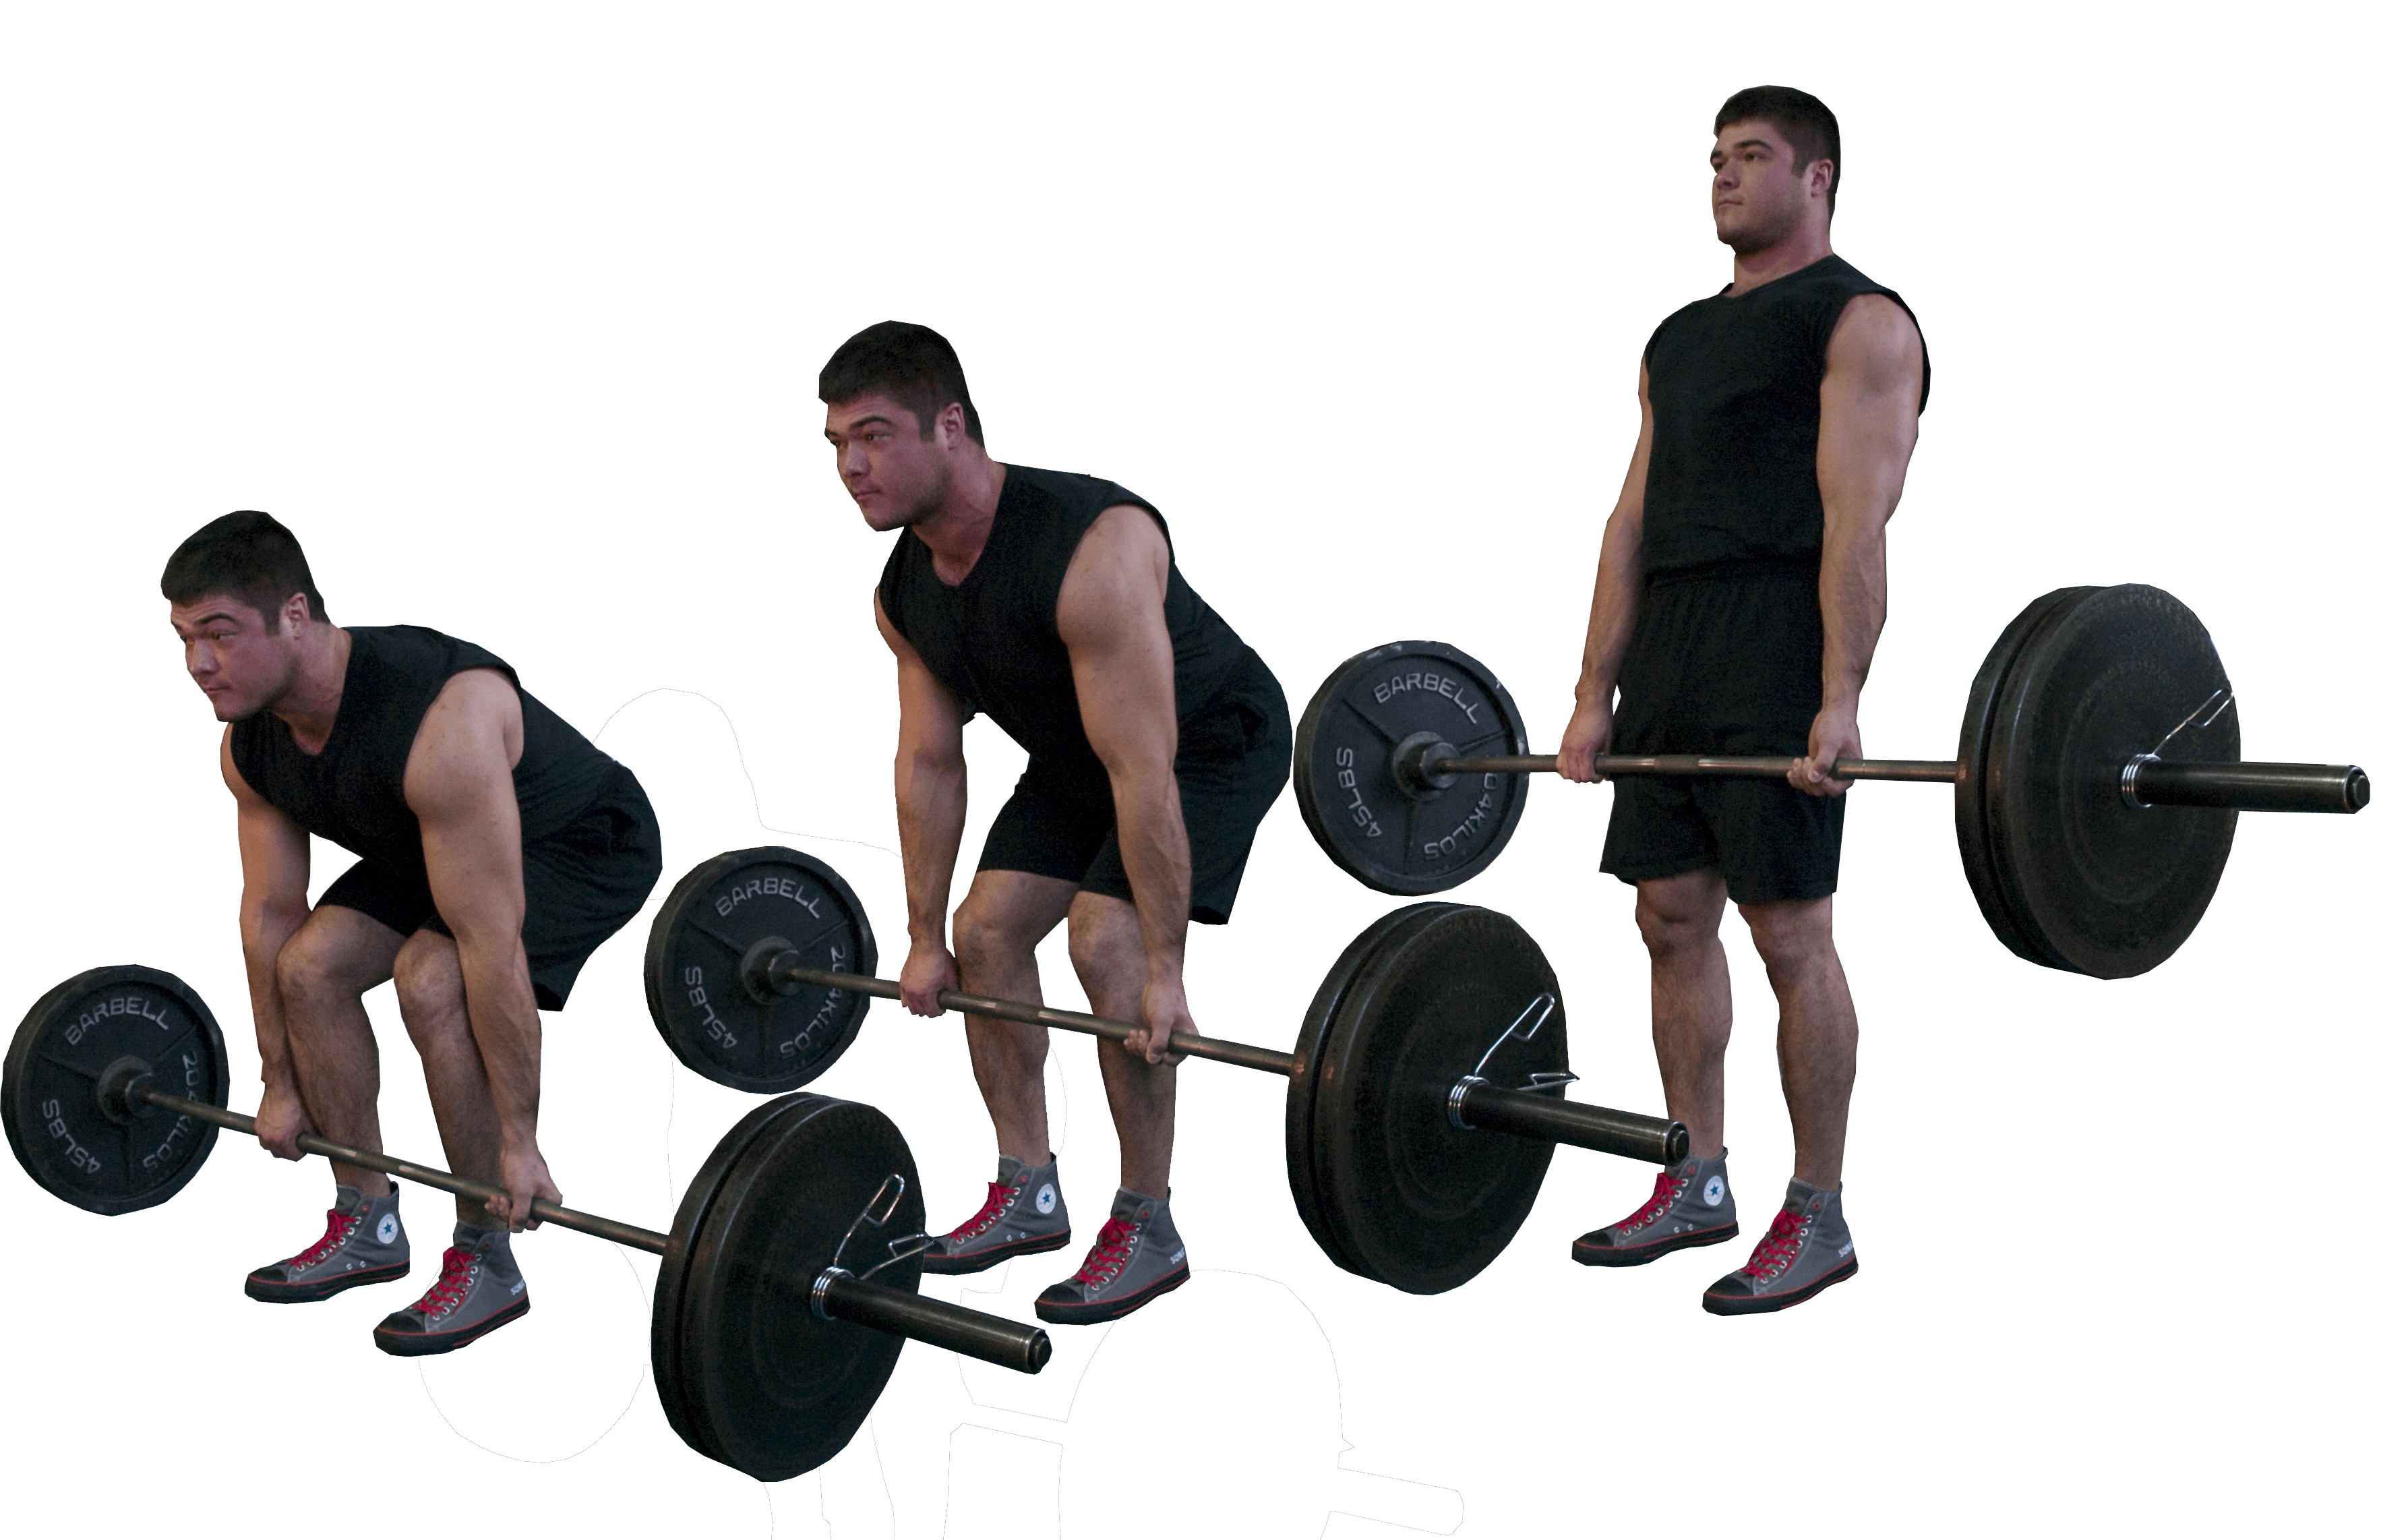
Start by setting up the barbell on the floor. Stand in front of the bar with your feet shoulder-width apart. The bar should be positioned over the middle of your feet. Bend down and grip the bar with an overhand grip, with your hands slightly wider than shoulder-width apart.
Step 2: Get Into The Starting Position

With the barbell in your hands, bend your knees and push your hips back to lower your body until your shins touch the bar. Keep your chest up and your back straight. This is the starting position for the barbell deadlift.
Step 3: Lift The Barbell Off The Ground
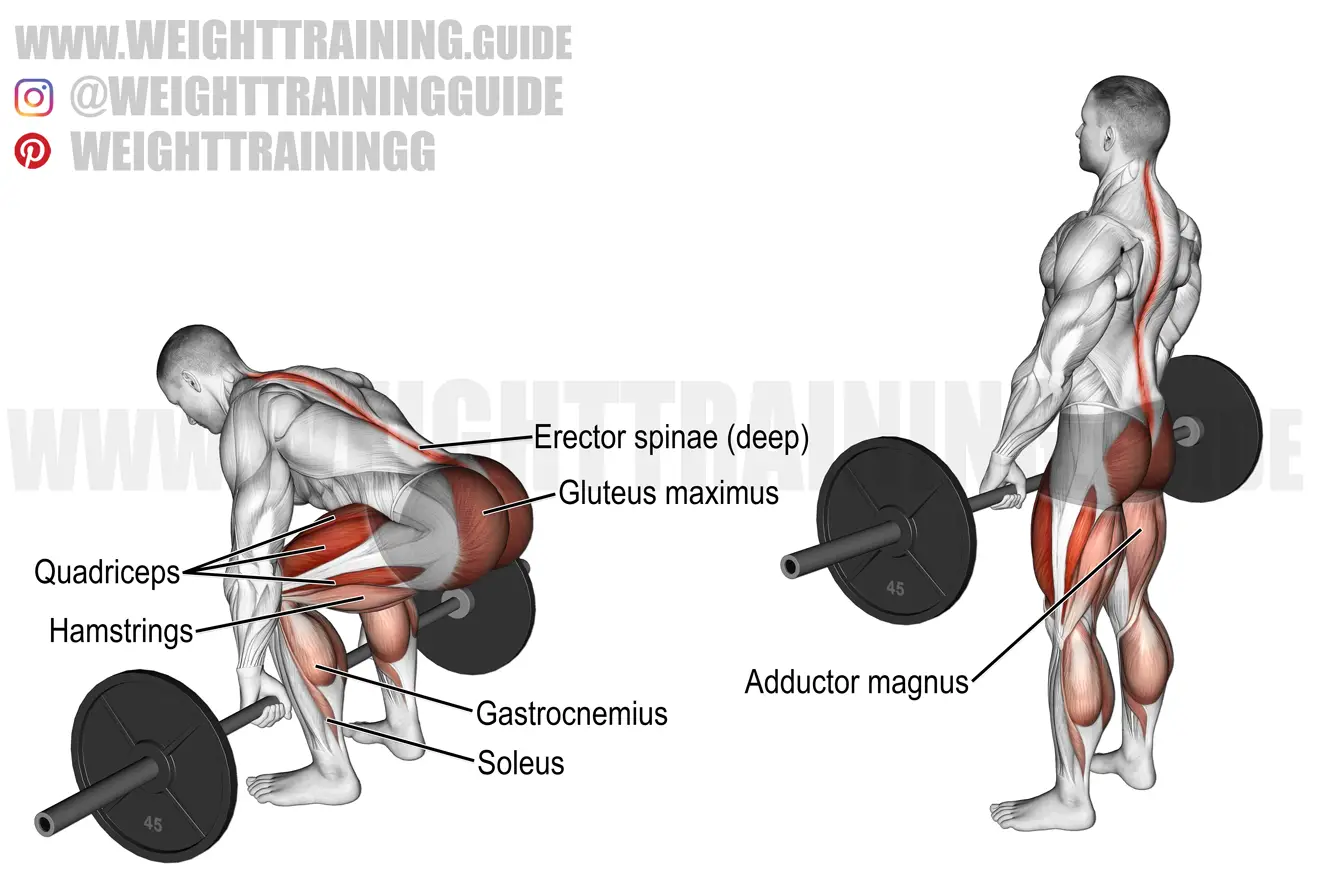
To lift the barbell off the ground, push through your heels and drive your hips forward while keeping your back straight. Keep the barbell close to your body as you lift it. You should feel the tension in your glutes, hamstrings, and lower back as you lift the weight.
Step 4: Stand Up Straight

Once you've lifted the barbell off the ground, stand up straight by extending your hips and knees. Keep your back straight and your chest up throughout the movement. Don't lean back or hyperextend your back as you stand up.
Step 5: Lower The Barbell

To lower the barbell back to the ground, reverse the movement by pushing your hips back and bending your knees. Lower the barbell to the ground with control, keeping it close to your body. Don't drop the weight or let it bounce off the ground.
Step 6: Repeat The Movement

Repeat the movement for the desired number of repetitions. Aim for 3-4 sets of 8-12 reps. Rest for 1-2 minutes between sets.
Tips For Proper Form And Technique

Here are some tips to help you maintain proper form and technique during the barbell deadlift:
- Keep your core tight throughout the movement.
- Don't round your back or let your shoulders slump forward.
- Keep your feet flat on the ground and don't lift your heels.
- Breathe in before lifting the weight and exhale as you lift it.
- Don't use momentum or jerky movements to lift the weight.
- Use a weight that's challenging but manageable for your fitness level.
Benefits Of Barbell Deadlift

Barbell deadlift offers several benefits for your fitness and health, including:
- Improved strength and muscle mass in the lower body.
- Better posture and spinal alignment.
- Increased bone density and joint stability.
- Improved overall athletic performance.
- Burns more calories than other exercises, making it great for weight loss.
Conclusion
Barbell deadlift is a powerful exercise for building strength and muscle mass in the lower body. However, it's essential to use proper form and technique to avoid injury and maximize the benefits of this exercise. With the right approach, you can enjoy improved fitness, health, and athletic performance.