High knees are a popular exercise among athletes and fitness enthusiasts. This high-impact exercise is known for its ability to burn calories and improve cardiovascular fitness. But what muscles does it work? In this article, we explore the muscles involved in high knees and how to perform this exercise properly.
The Muscles Involved in High Knees

High knees are a great way to strengthen and tone your lower body muscles, including your quadriceps, hamstrings, glutes, and calves. This exercise also engages your core muscles, including your rectus abdominis, transverse abdominis, and obliques.
The quadriceps are the large muscles on the front of your thighs. They are responsible for straightening your leg at the knee joint. The hamstrings are the muscles on the back of your thighs. They are responsible for bending your leg at the knee joint. Together, these muscles help you perform the kicking motion of high knees.
The glutes are the muscles in your buttocks. They are responsible for hip extension and rotation. When you perform high knees, your glutes help to stabilize your hips and maintain proper form.
The calves are the muscles on the back of your lower legs. They are responsible for plantarflexion, which is the movement of pointing your toes downward. When you perform high knees, your calves help to lift your knees and improve your overall balance.
Your core muscles are also engaged during high knees. These muscles help to stabilize your spine and maintain proper posture. The rectus abdominis is the muscle that runs down the front of your abdomen. It is responsible for flexing your trunk. The transverse abdominis is the muscle that runs across your abdomen. It is responsible for stabilizing your spine. The obliques are the muscles on the sides of your abdomen. They are responsible for rotating your trunk.
How to Perform High Knees
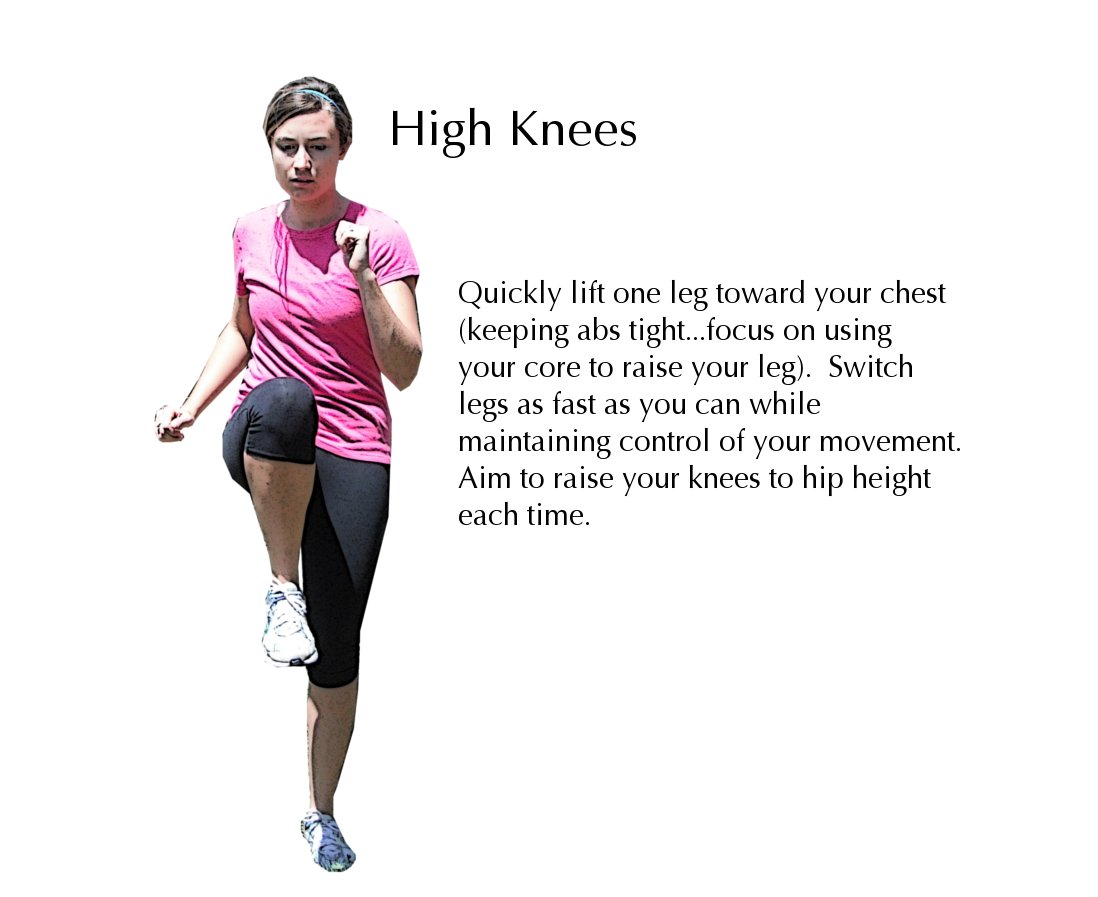
To perform high knees, follow these steps:
- Stand with your feet hip-width apart and your arms at your sides.
- Lift your right knee up towards your chest while simultaneously lifting your left arm up.
- Lower your right foot back down to the ground and switch sides, lifting your left knee up towards your chest while simultaneously lifting your right arm up.
- Continue alternating legs and arms for the desired number of repetitions.
When performing high knees, it is important to maintain proper form. Keep your core engaged and your back straight. Land softly on the balls of your feet to reduce impact on your joints.
Variations of High Knees

There are several variations of high knees that you can try to add variety to your workout:
- High knees with a jump: Instead of lifting your knees up one at a time, jump off the ground and bring your knees up to your chest.
- High knees with a twist: As you lift your knee up towards your chest, twist your torso towards that knee.
- High knees with a lateral shuffle: Instead of standing in one place, shuffle to the side as you lift your knees up towards your chest.
Benefits of High Knees

High knees offer several benefits for your overall health and fitness:
- Cardiovascular fitness: High knees are a high-impact exercise that can help improve your cardiovascular fitness and burn calories.
- Lower body strength: High knees are an effective way to strengthen and tone your lower body muscles.
- Core strength: High knees engage your core muscles, helping to improve your overall strength and stability.
- Balance and coordination: High knees require balance and coordination, making them a great exercise for improving these skills.
Conclusion
High knees are a great exercise for improving your cardiovascular fitness, strengthening and toning your lower body muscles, and engaging your core muscles. They are also a fun and challenging exercise that can be done anywhere with no equipment needed. Try adding high knees to your workout routine to reap the many benefits they offer.
Related video of High Knees Work What Muscles

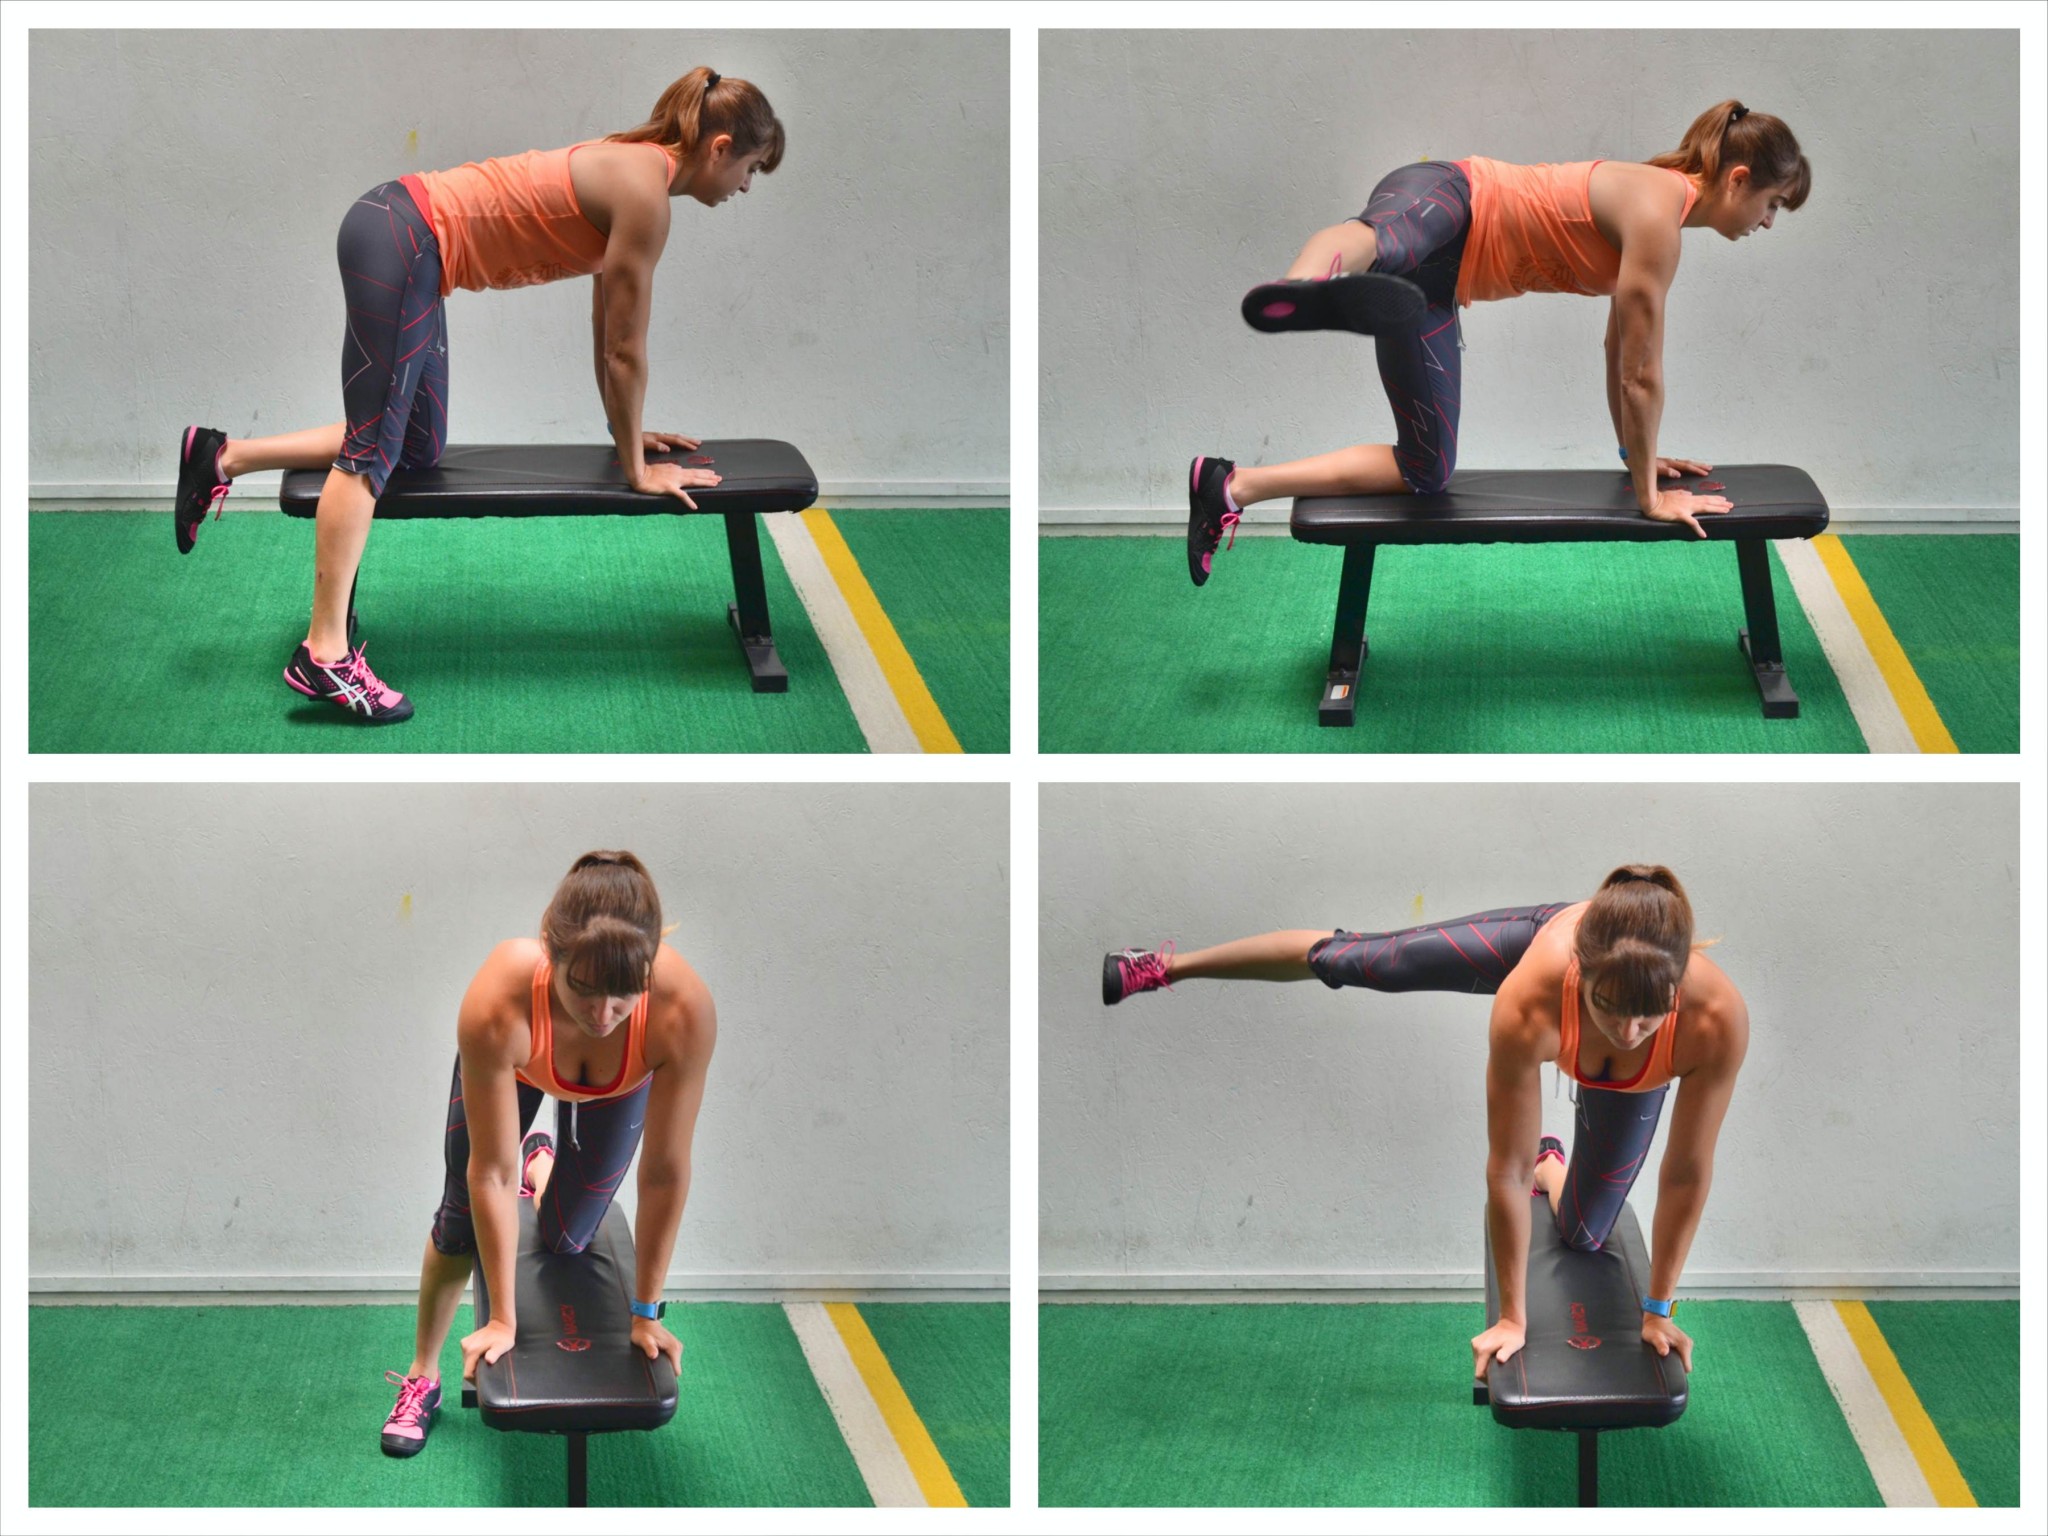
Fire hydrant exercise is a popular exercise that involves moving your legs in a motion similar to a dog lifting its leg to pee on a fire hydrant. It is a great exercise for strengthening your glutes, hips, and thighs. This exercise is also known as "dog pee exercise" or "pee on the fire hydrant exercise."
How to Perform Fire Hydrant Exercise

To perform the fire hydrant exercise, follow these simple steps:
- Get down on all fours with your hands directly under your shoulders and your knees under your hips.
- Lift your right leg out to the side, keeping your knee bent at a 90-degree angle.
- Pause at the top of the movement and squeeze your glutes.
- Lower your leg back down to the starting position and repeat on the other side.
You can perform this exercise for 3 sets of 10-15 repetitions on each side.
Benefits of Fire Hydrant Exercise

The fire hydrant exercise offers several benefits, including:
- Strengthening your glutes, hips, and thighs.
- Improving your balance and stability.
- Reducing your risk of injury during sports or daily activities.
- Helping to relieve lower back pain.
This exercise is also great for targeting specific areas of your lower body, such as your outer thighs and hips.
Modifications for Fire Hydrant Exercise

If you find the fire hydrant exercise too challenging, there are a few modifications you can make to make it easier:
- Perform the exercise without lifting your leg as high.
- Place a resistance band around your knees to add more resistance.
- Perform the exercise in a standing position instead of on all fours.
If you find the exercise too easy, you can make it more challenging by adding ankle weights or using a resistance band with more tension.
Precautions for Fire Hydrant Exercise
While the fire hydrant exercise is generally safe for most people, there are a few precautions you should take:
- If you have a knee or hip injury, consult your doctor before performing this exercise.
- Start with a low number of repetitions and gradually increase as you get stronger.
- Avoid arching your back or rounding your shoulders during the exercise.
- Engage your core muscles to help stabilize your spine.
Conclusion
The fire hydrant exercise is a simple yet effective exercise for strengthening your glutes, hips, and thighs. It is also great for improving your balance and stability. With a few modifications, you can make the exercise easier or more challenging to suit your fitness level. Remember to take precautions and consult your doctor if you have any injuries before performing this exercise.
Related video of What Is A Fire Hydrant Exercise

If you're looking for a challenging exercise that targets your chest and triceps, look no further than the flaring elbows push up. This advanced variation of the traditional push up requires more strength and stability, but it can lead to impressive gains in upper body strength and muscle definition.
What Are Flaring Elbows Push Ups?
The flaring elbows push up is a type of push up that involves positioning your elbows out to the sides, rather than keeping them tucked in close to your body. This changes the angle of the exercise and shifts the emphasis to your chest muscles, making the exercise more challenging.
To perform a flaring elbows push up, start in a standard push up position with your hands shoulder-width apart and your toes on the ground. As you lower your body towards the ground, flare your elbows out to the sides so that they form a 45-degree angle with your body. Push back up to the starting position, keeping your elbows out to the sides throughout the movement.
Benefits of Flaring Elbows Push Ups
Flaring elbows push ups offer a number of benefits for those looking to build upper body strength and definition. Here are just a few:
- Increased chest activation: By flaring your elbows out to the sides, you engage your chest muscles more than you would with a traditional push up. This can lead to greater muscle development and definition in the chest.
- Greater triceps activation: Flaring your elbows also places more emphasis on your triceps muscles, making this exercise a great way to target the back of your arms.
- Improved stability: Because flaring elbows push ups require greater stability than traditional push ups, they can help improve your overall upper body strength and stability.

Tips for Performing Flaring Elbows Push Ups
While flaring elbows push ups are a great exercise for building upper body strength and definition, they can be challenging to perform correctly. Here are a few tips to help you get the most out of this exercise:
- Start with traditional push ups: If you're new to push ups or haven't done them in a while, start with traditional push ups before attempting flaring elbows push ups.
- Engage your core: To maintain proper form and stability during this exercise, engage your core muscles throughout the movement.
- Keep your elbows at a 45-degree angle: As you lower your body towards the ground, keep your elbows at a 45-degree angle to your body. This will help you engage your chest muscles more effectively.
- Don't let your hips sag: To maintain proper form, keep your hips in line with your shoulders and feet throughout the movement. Don't let your hips sag towards the ground.
Variations of Flaring Elbows Push Ups
If you're looking to switch up your push up routine, here are a few variations of flaring elbows push ups to try:
- Close-grip flaring elbows push ups: Instead of positioning your hands shoulder-width apart, bring them closer together so that your thumbs and index fingers form a triangle shape. Perform flaring elbows push ups in this position to target your chest and triceps even more.
- Decline flaring elbows push ups: To make this exercise even more challenging, place your feet on an elevated surface such as a bench or step. This will increase the amount of weight you're pushing and engage your upper chest muscles even more.
- Spiderman flaring elbows push ups: As you lower your body towards the ground, bring one knee up towards your elbow. Alternate knees with each repetition to engage your obliques and increase the difficulty of the exercise.

Conclusion
Flaring elbows push ups are a challenging but effective exercise for building upper body strength and definition. By incorporating this exercise into your regular workout routine, you can target your chest and triceps muscles while also improving your overall stability and core strength.
Related video of Flaring Elbows Push Ups: The Ultimate Guide

If you're an athlete or someone who loves to exercise, you may have experienced pain or tightness in your IT band (iliotibial band) at some point in your life. The IT band is a long, thick connective tissue that runs from your hip down to your knee. It's responsible for stabilizing your knee during movement and helps in flexing and extending your hip. However, overuse or improper form during exercise can lead to IT band syndrome, which causes pain and inflammation. One of the effective ways to alleviate IT band syndrome is by using a foam roller. In this article, we'll discuss the benefits of using a foam roller for IT band, techniques to use it effectively, and tips to prevent IT band syndrome.
Benefits Of Using Foam Roller For IT Band

A foam roller is a cylindrical tool made of foam that helps in self-myofascial release (SMR) – a technique that helps in releasing tight muscles and fascia. When you use a foam roller for IT band, it helps in breaking up adhesions and tightness in the connective tissue, which leads to reduced pain and inflammation. Foam rolling your IT band also helps in improving the blood flow and oxygenation to the area, which aids in faster recovery and healing.
Techniques To Use Foam Roller For IT Band

Here are some techniques to use foam roller for IT band:
- Place the foam roller perpendicular to your IT band and lie on your side with the roller under your hip.
- Roll up and down from your hip to your knee, pausing on any tender spots for 20-30 seconds.
- Use your arms and other leg to control the pressure and movement of the roller.
- You can also roll your glutes and hamstring muscles as tightness in these areas can contribute to IT band syndrome.
Tips To Prevent IT Band Syndrome

Here are some tips to prevent IT band syndrome:
- Warm-up before exercising and cool down after exercising.
- Stretch your IT band and other muscles regularly.
- Gradually increase your exercise intensity and duration to avoid sudden stress on your IT band.
- Use proper form and technique during exercise.
- Invest in good quality shoes and replace them when they're worn out.
Conclusion
Foam rolling your IT band is an effective way to alleviate pain and tightness in the area. By using the techniques and tips mentioned in this article, you can prevent IT band syndrome and improve your overall performance. However, if you have severe or chronic pain, it's always recommended to consult a healthcare professional.
Related video of Foam Roller For It Band: Benefits, Techniques, and Tips

For fitness enthusiasts, pull up bars are essential equipment to help them build upper body strength and work on their core muscles. Among the different types of pull up bars, the neutral grip pull up bar has gained popularity due to its many benefits. In this article, we will discuss the benefits of using a neutral grip pull up bar, the different types available in the market, and how to use them for maximum results.
Benefits of Using a Neutral Grip Pull Up Bar

Neutral grip pull up bars have several advantages over other types of pull up bars. First, they are easier on the joints, especially the shoulders and wrists, as they put less stress on these areas. Second, they allow for a more natural range of motion, making them ideal for beginners or those who are recovering from injuries. Third, they engage more muscles than traditional pull ups, including the biceps, forearms, and upper back.
Types of Neutral Grip Pull Up Bars
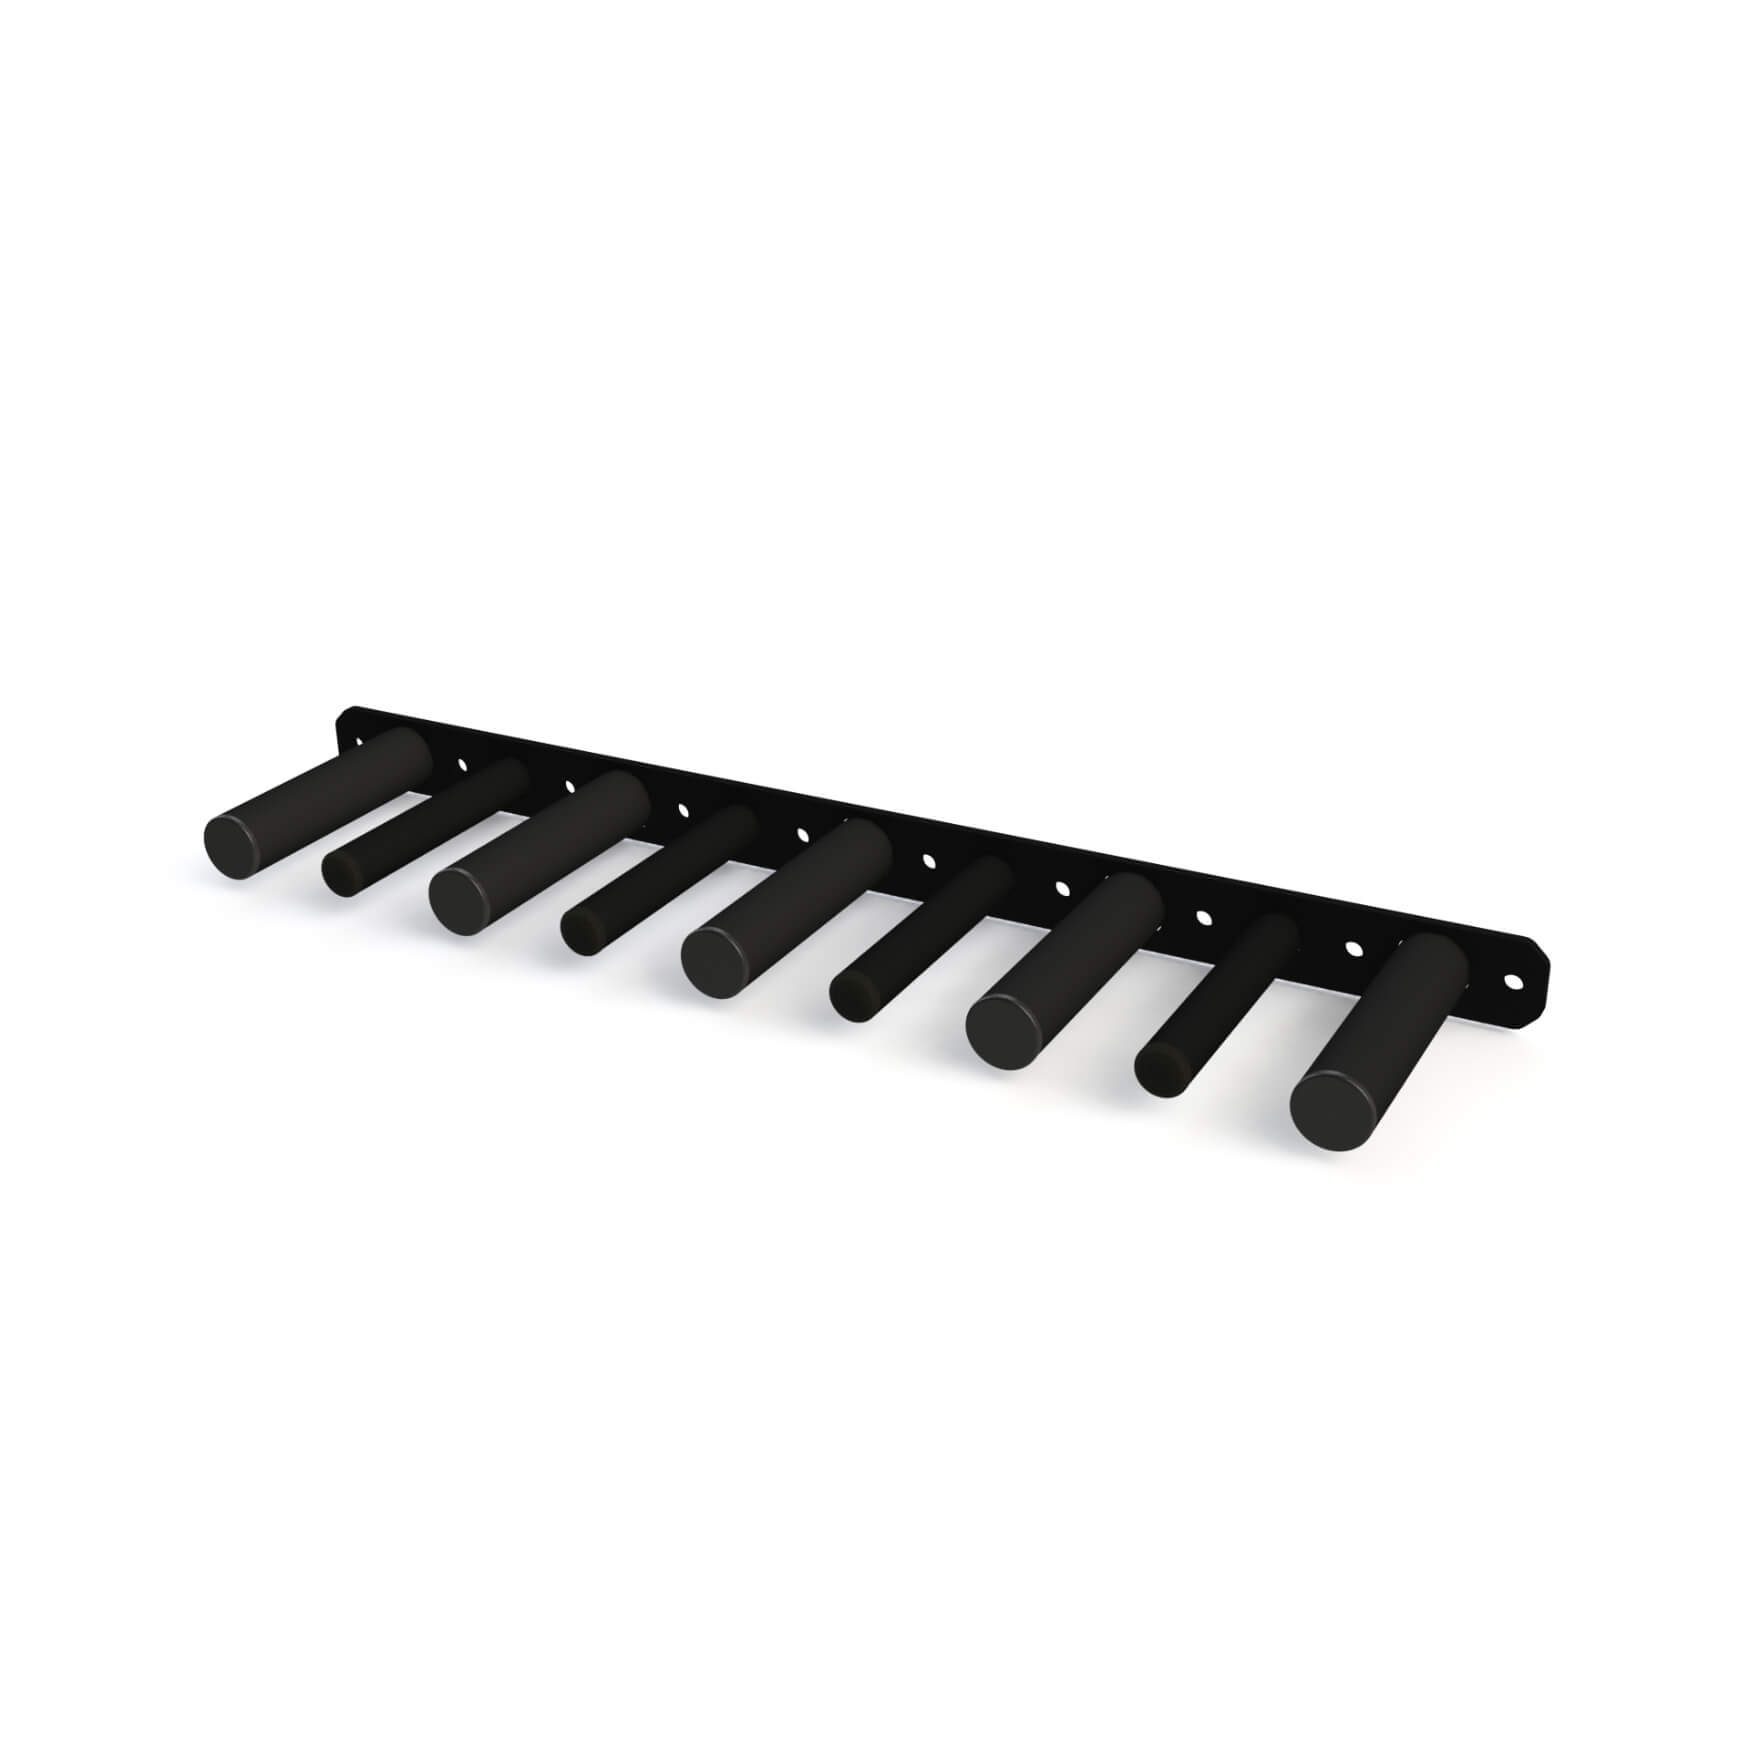
There are different types of neutral grip pull up bars available in the market, each with its own unique features and benefits. The most common types include:
Doorway pull up bars: These are designed to fit over a standard doorway and can be easily installed without any drilling or screws. They usually have padded grips, adjustable widths, and can support up to 300 pounds.
Wall-mounted pull up bars: These are secured to the wall with screws and brackets and can support up to 600 pounds. They are usually made of heavy-duty steel and have multiple grip options, including neutral, wide, and close-grip.
Stand-alone pull up bars: These are freestanding units that can be used indoors or outdoors. They are usually made of steel, have multiple grip options, and can support up to 1000 pounds.
How to Use a Neutral Grip Pull Up Bar

Before using a neutral grip pull up bar, it's essential to warm up your muscles and stretch your arms, shoulders, and back. To perform a neutral grip pull up, follow these steps:
- Stand facing the pull up bar and grab the handles with your palms facing each other.
- Hang from the bar with your arms fully extended and your feet off the ground.
- Pull yourself up towards the bar, keeping your elbows close to your body and your shoulders down.
- Pause at the top of the motion, then slowly lower yourself back down to the starting position.
- Repeat for the desired number of reps.
For beginners, it's recommended to start with 3 sets of 5 reps and gradually increase the number of reps and sets as you get stronger.
Conclusion
Neutral grip pull up bars are an excellent addition to any home gym or workout routine. They offer several benefits, including reduced joint stress, increased muscle engagement, and a more natural range of motion. By choosing the right type of neutral grip pull up bar and following proper form and technique, you can achieve your fitness goals and improve your overall health and well-being.
Related video of Neutral Grip Pull Up Bar: Benefits, Types, and How to Use
If you're looking for a way to target your rear delts, the dumbbell rear delt raise is an excellent exercise to add to your workout routine. This exercise is perfect for strengthening and sculpting your shoulders, giving you a well-rounded upper body. In this article, we'll cover the proper form, variations, and benefits of the dumbbell rear delt raise so that you can add it to your workout with confidence.

What Are the Rear Delts?
The rear delts, or posterior deltoids, are the muscles located on the back of your shoulders. These muscles are often neglected in most workout routines, which can lead to muscle imbalances and poor posture. By targeting your rear delts with the dumbbell rear delt raise, you can improve your overall shoulder strength and stability.
How to Perform the Dumbbell Rear Delt Raise
To perform the dumbbell rear delt raise, follow these steps:
- Stand with your feet shoulder-width apart and hold a dumbbell in each hand.
- Bend your knees slightly and hinge forward at the hips until your torso is parallel to the ground.
- Engage your core and keep your back flat throughout the exercise.
- Start with your arms hanging straight down and palms facing each other.
- Exhale and lift your arms out to the sides, keeping them straight and parallel to the ground.
- Pause briefly at the top of the movement before slowly lowering the weights back down to the starting position.
- Repeat for the desired number of reps.

Common Mistakes to Avoid
While the dumbbell rear delt raise is a relatively simple exercise, it's important to perform it with proper form to avoid injury and maximize results. Here are some common mistakes to avoid:
- Swinging the weights: To target your rear delts effectively, make sure to keep your movements slow and controlled.
- Using too heavy of weights: It's better to use lighter weights and focus on proper form than to use weights that are too heavy and sacrifice form.
- Rounding your back: Keep your back flat throughout the exercise to avoid straining your lower back.
- Not engaging your core: To maintain proper form, engage your core and keep your abs tight throughout the exercise.
Variations of the Dumbbell Rear Delt Raise
If you want to switch up your shoulder routine, try these variations of the dumbbell rear delt raise:
- Bent-over rear delt raise: Instead of standing, perform the exercise while bent over at a 45-degree angle.
- Seated rear delt raise: Sit on a bench with your feet flat on the ground and perform the exercise while seated.
- Cable rear delt raise: Use a cable machine instead of dumbbells to perform the exercise.

Benefits of the Dumbbell Rear Delt Raise
The dumbbell rear delt raise offers numerous benefits, including:
- Improved shoulder strength and stability
- Reduced risk of shoulder injury
- Better posture and alignment
- Increased shoulder definition and size
Conclusion
If you're looking to add some variety to your shoulder routine and target your rear delts, the dumbbell rear delt raise is an excellent exercise to try. By performing this exercise with proper form and incorporating variations, you can strengthen and sculpt your shoulders for a well-rounded upper body.
Related video of Dumbbell Rear Delt Raise: The Ultimate Guide to Sculpt Your Shoulders

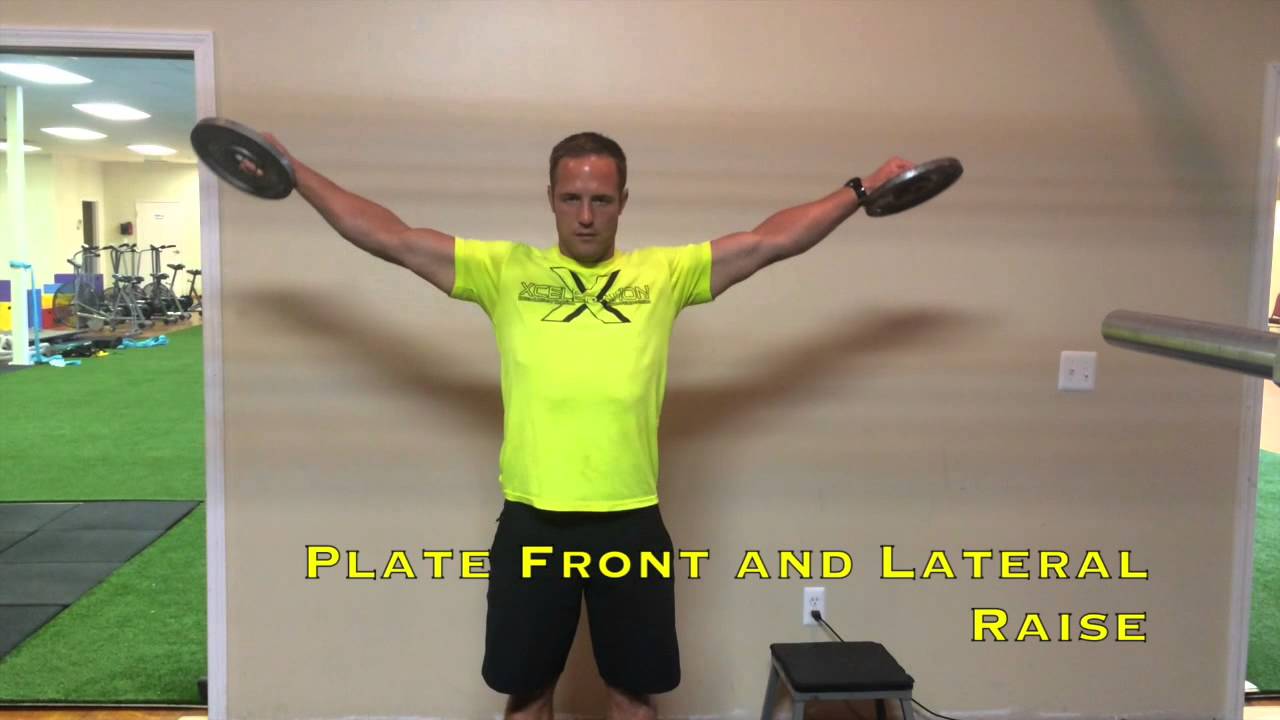
Are you looking for a new way to target your shoulder muscles? Lateral raises with plates are a great exercise to add to your routine. This exercise is simple but effective, and it can be done with just a few plates from your gym or home gym. In this article, we’ll show you how to do lateral raises with plates and explain why they are so effective for building shoulder strength and size.
What Are Lateral Raises With Plates?

Lateral raises with plates are a variation of the traditional lateral raise exercise. Instead of using dumbbells, you use weight plates to perform the exercise. The movement is the same – you raise your arms out to the sides – but the plates provide a different type of resistance.
How to Do Lateral Raises With Plates

To perform lateral raises with plates, follow these steps:
- Stand with your feet shoulder-width apart and hold a plate in each hand.
- With your arms straight, raise the plates out to your sides until they are parallel to the ground.
- Pause for a moment, then lower the plates back down to your sides.
- Repeat for the desired number of reps.
You can also perform this exercise one arm at a time if you prefer.
Why Lateral Raises With Plates Are Effective
Lateral raises with plates are effective for several reasons:
- Variation: Adding variation to your workout routine is important for avoiding plateaus and keeping your muscles guessing.
- Isolation: Lateral raises with plates isolate the shoulder muscles, making them a great exercise for building definition and size in the shoulders.
- Resistance: Plates provide a different kind of resistance than dumbbells, which can help target different muscles and improve overall strength.
Tips for Performing Lateral Raises With Plates

Here are some tips to help you get the most out of lateral raises with plates:
- Start light: Lateral raises with plates can be more challenging than they look, so start with a lighter weight to ensure proper form.
- Keep your arms straight: Make sure to keep your arms straight throughout the exercise to properly target the shoulder muscles.
- Control the movement: Don’t swing the plates or use momentum to lift them. Instead, focus on controlled movements.
- Breathe: Exhale as you lift the plates and inhale as you lower them.
Incorporating Lateral Raises With Plates Into Your Workout Routine

Lateral raises with plates can be incorporated into your shoulder workout routine in several ways:
- As a warm-up: Start your shoulder workout with a few sets of lateral raises with plates to warm up your shoulder muscles.
- As a finisher: End your shoulder workout with a few sets of lateral raises with plates to really burn out your shoulder muscles.
- As a standalone exercise: If you’re short on time or want to target your shoulder muscles specifically, lateral raises with plates can be a standalone exercise.
Conclusion
Lateral raises with plates are a great exercise to incorporate into your shoulder workout routine. They can help you build shoulder strength and size, while adding variation to your routine. Make sure to start light, keep your arms straight, and control the movement to get the most out of this exercise.
Related video of Lateral Raises With Plates: How to Do Them and Why They Are Effective

If you're looking to add variety to your leg day routine, then the sumo squat with kettlebell is an excellent exercise to try. This exercise targets your legs, glutes, and core, and it's a fantastic way to build lower body strength and power. In this article, we'll take a closer look at the sumo squat with kettlebell and how to perform it correctly.
What is a Sumo Squat With Kettlebell?

The sumo squat with kettlebell is a variation of the traditional sumo squat. Instead of holding a dumbbell or barbell, you hold a kettlebell in front of your body. This exercise targets your glutes, quads, hamstrings, and core muscles. It's also a great way to work on your balance and stability.
How to Perform a Sumo Squat With Kettlebell
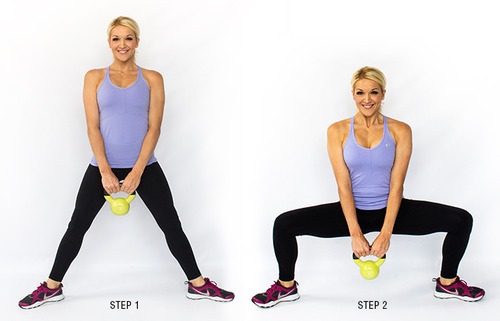
To perform a sumo squat with kettlebell, follow these steps:
- Stand with your feet wider than shoulder-width apart and your toes pointing outwards.
- Hold a kettlebell with both hands in front of your body.
- Bend your knees and lower your body until your thighs are parallel to the ground.
- Push through your heels and return to the starting position.
- Repeat for the desired number of reps.
It's important to keep your back straight and your chest up throughout the exercise. You should also engage your core muscles to maintain stability.
Variations of Sumo Squat With Kettlebell

There are several variations of the sumo squat with kettlebell that you can try to add variety to your workout routine:
- Sumo squat with one arm kettlebell: Hold the kettlebell with one hand instead of both.
- Sumo squat with goblet hold: Hold the kettlebell close to your chest with both hands.
- Sumo squat with overhead kettlebell: Hold the kettlebell above your head with both hands.
Benefits of Sumo Squat With Kettlebell
The sumo squat with kettlebell offers several benefits, including:
- Strengthening your lower body muscles, including glutes, quads, and hamstrings.
- Improving your balance and stability.
- Working on your core muscles.
- Burning calories and promoting weight loss.
- Increasing your overall strength and power.
Precautions and Tips

Before attempting the sumo squat with kettlebell, keep these precautions and tips in mind:
- Choose a kettlebell weight that you can comfortably lift and control.
- Warm up your lower body muscles before starting the exercise.
- Keep your back straight and your chest up throughout the exercise.
- Engage your core muscles to maintain stability.
- Start with a low number of reps and gradually increase as you become more comfortable with the exercise.
Conclusion
The sumo squat with kettlebell is a fantastic exercise that can help you build lower body strength and power. It's also a great way to work on your balance and stability. By following the proper form and technique, you can reap the many benefits of this exercise and take your leg day routine to the next level.
Related video of Sumo Squat With Kettlebell: A Complete Guide

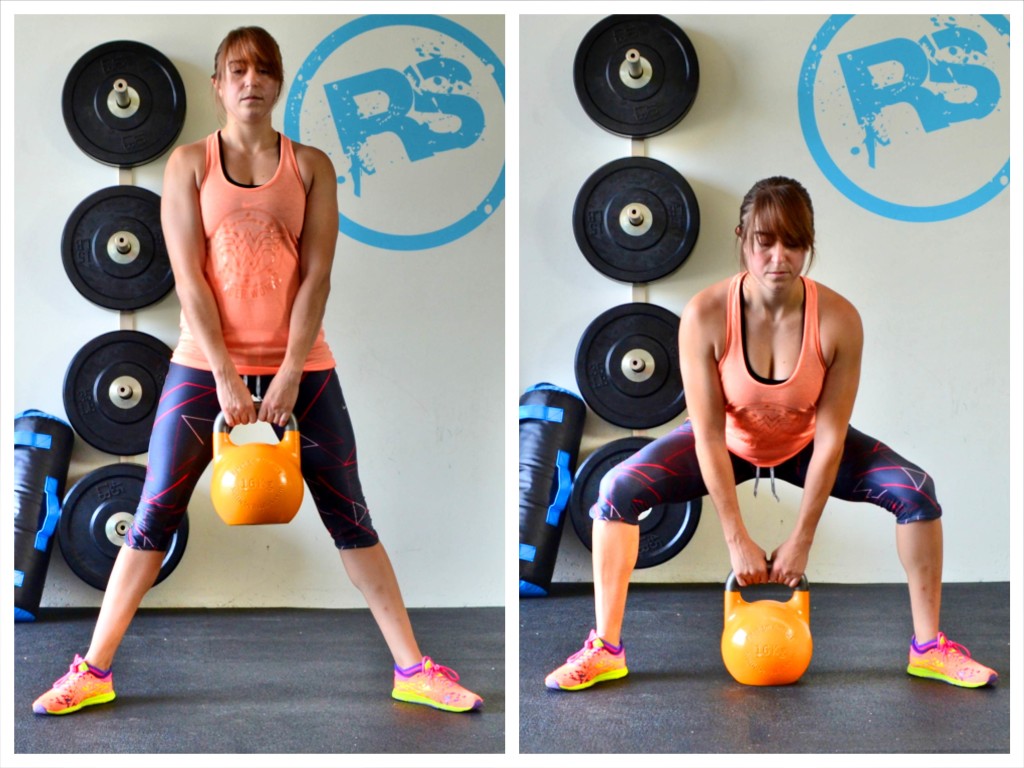
If you're looking to build strength and tone your legs, the sumo squat with dumbbell is an excellent exercise to add to your workout routine. This exercise targets your quadriceps, glutes, hamstrings, and inner thighs, making it a highly effective lower body exercise.
How to Perform Sumo Squat With Dumbbell

To perform sumo squat with a dumbbell, follow these steps:
- Stand with your feet wider than shoulder-width apart and your toes pointing outwards.
- Hold a dumbbell with both hands, and let it hang in front of your body.
- Engage your core and keep your back straight as you lower your body until your thighs are parallel to the ground. Make sure your knees are aligned with your toes.
- Push through your heels to return to the starting position.
- Repeat for the desired number of reps.
Variations of Sumo Squat With Dumbbell

There are several variations of the sumo squat with a dumbbell that you can try to target different muscles and add variety to your workout routine. Here are a few variations:
- Sumo Squat with Alternating Heel Raise: Perform a sumo squat as usual, but lift one heel off the ground while lowering your body. Alternate between heels with each rep.
- Sumo Squat with Pulse: Lower your body into a sumo squat and pulse up and down a few inches before returning to the starting position.
- Sumo Squat with Calf Raise: Perform a sumo squat as usual, but lift both heels off the ground while lowering your body.
Benefits of Sumo Squat With Dumbbell

Sumo squat with a dumbbell is a highly effective exercise for building lower body strength and toning your legs. Here are some benefits of this exercise:
- Targets multiple muscles: This exercise targets your quadriceps, glutes, hamstrings, and inner thighs, making it a highly effective lower body exercise.
- Increases strength: Sumo squat with a dumbbell can help build lower body strength, which can translate to improved performance in other exercises and daily activities.
- Improves balance: This exercise requires you to maintain balance and stability, which can improve your overall balance and coordination.
- Boosts calorie burn: Sumo squat with a dumbbell is a compound exercise that engages multiple muscle groups, making it an effective calorie-burning exercise.
Tips for Performing Sumo Squat With Dumbbell

Here are some tips to help you perform sumo squat with a dumbbell correctly and safely:
- Keep your back straight: Maintaining good posture is crucial for this exercise to avoid injury and target the correct muscles.
- Engage your core: Engaging your core can help stabilize your body and prevent lower back pain.
- Start with a light weight: If you're new to this exercise, start with a light weight and focus on proper form before gradually increasing the weight.
- Don't let your knees cave in: Make sure your knees are aligned with your toes throughout the exercise to avoid knee pain.
Conclusion
The sumo squat with dumbbell is an excellent exercise for building lower body strength and toning your legs. By following the correct form and using variations, you can target different muscles and add variety to your workout routine. Remember to start with a light weight and focus on proper form to avoid injury and get the most out of this exercise.
Related video of Sumo Squat With Dumbbell: How to Perform and Its Benefits

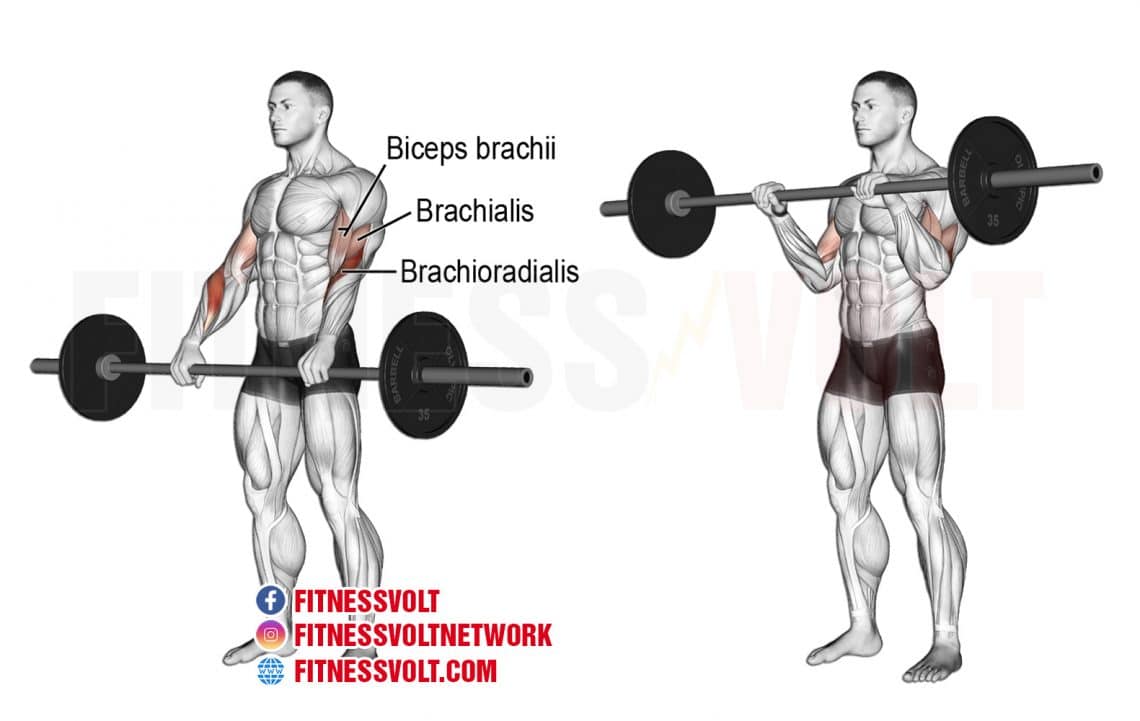
Reverse Grip Bar Curls are a variation of bicep curls that can help you build bigger and stronger biceps. This exercise targets your brachialis muscles, which are located beneath your biceps and contribute to the overall size and definition of your arms. In this article, we will show you how to perform Reverse Grip Bar Curls and discuss its benefits.
How to Perform Reverse Grip Bar Curls

To perform Reverse Grip Bar Curls:
- Stand upright with your feet shoulder-width apart and grab the barbell with an underhand grip, with your palms facing up.
- Hold the bar with your hands shoulder-width apart.
- Keep your elbows close to your body and your upper arms stationary.
- Curl the barbell up towards your shoulders, while keeping your wrists straight.
- Hold the contraction for a second and then slowly lower the barbell back down to the starting position.
- Repeat for the desired number of repetitions.
It is important to keep your movements slow and controlled throughout the exercise to avoid injury and maximize muscle activation.
Benefits of Reverse Grip Bar Curls
Reverse Grip Bar Curls can provide several benefits:
- Increased Bicep Activation: The reverse grip puts more emphasis on the brachialis muscles, which can lead to greater bicep activation and growth.
- Improved Grip Strength: Holding the bar with an underhand grip can improve your grip strength, which can translate to other exercises such as deadlifts and pull-ups.
- Less Strain on Wrists: The underhand grip can also reduce strain on your wrists compared to overhand grip curls, making it a good option for those with wrist pain or injuries.
- Variety in Your Workout: Adding Reverse Grip Bar Curls to your bicep workout can provide variety and challenge your muscles in new ways, helping you overcome plateaus and improve overall muscle development.
Conclusion
Reverse Grip Bar Curls are a great exercise to add to your bicep workout routine. This exercise can help you build bigger and stronger biceps while also providing other benefits such as improved grip strength and less strain on your wrists. Make sure to include this exercise in your workout routine and perform it with proper form and control.
Related video of Reverse Grip Bar Curls: How to Perform and Its Benefits

The medicine ball toe touch is a great exercise for building core strength and stability. It involves lying on your back with your legs straight up in the air, holding a medicine ball in your hands, and touching the ball to your toes. This exercise targets your abs, hip flexors, and lower back, making it a great addition to any workout routine. In this article, we'll take a closer look at how to perform the medicine ball toe touch, its benefits, and some variations to try.
How to Perform the Medicine Ball Toe Touch

To perform the medicine ball toe touch, follow these steps:
- Lie on your back with your legs straight up in the air, feet flexed.
- Hold a medicine ball in your hands, arms extended towards the ceiling.
- Exhale and engage your abs as you lift your shoulders off the ground.
- Simultaneously lift your legs towards the ceiling, keeping them straight.
- Reach the medicine ball towards your toes, keeping your arms straight.
- Lower your shoulders and legs back to the starting position.
- Repeat for the desired number of reps.
It's important to keep your abs engaged throughout the exercise to protect your lower back. You can also modify the exercise by bending your knees slightly or using a lighter medicine ball.
Benefits of the Medicine Ball Toe Touch

The medicine ball toe touch has several benefits, including:
- Building core strength and stability
- Improving balance and coordination
- Targeting the abs, hip flexors, and lower back
- Increasing flexibility in the hamstrings and lower back
- Burning calories and promoting weight loss
Because it engages multiple muscle groups at once, the medicine ball toe touch is an efficient way to strengthen your core and improve your overall fitness.
Variations of the Medicine Ball Toe Touch

There are several variations of the medicine ball toe touch that you can try to mix up your workout:
- Side-to-Side Toe Touch: Instead of reaching the ball towards your toes, reach it towards one side of your body, then the other.
- Single Leg Toe Touch: Lift one leg off the ground and reach the ball towards the opposite foot.
- Russian Twist with Medicine Ball: Sit on the ground with your knees bent and feet flat. Hold the medicine ball in front of your chest and twist your torso to one side, tapping the ball on the ground. Twist to the other side and repeat.
These variations can help target different areas of your core and challenge your balance and coordination.
Conclusion
The medicine ball toe touch is a challenging yet effective exercise for building core strength and stability. By adding it to your workout routine, you can improve your balance, coordination, and overall fitness. Try different variations to keep your workouts interesting and challenging. As with any exercise, it's important to listen to your body and modify as needed to prevent injury.
Related video of Medicine Ball Toe Touch: A Comprehensive Guide
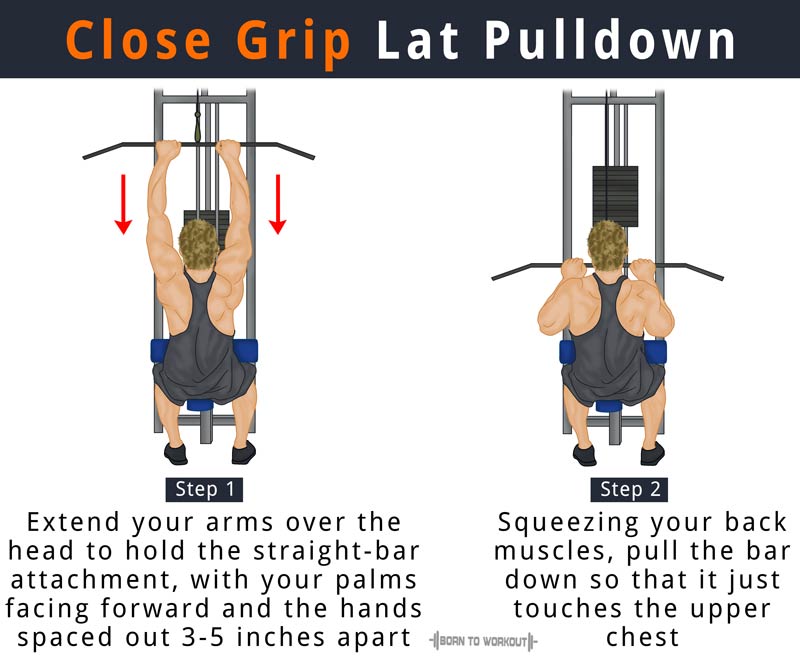
Close grip pulldown is an exercise that targets your back muscles. It is a variation of the traditional lat pulldown exercise, but instead of using a wide grip, you use a closer grip. This exercise is perfect for those who want to strengthen their back muscles and improve their posture. In this article, we will discuss the muscles worked during close grip pulldowns and how to perform the exercise correctly.
The Muscles Worked During Close Grip Pulldowns
Close grip pulldowns primarily target your back muscles, specifically your latissimus dorsi. This muscle is the largest muscle in your back and is responsible for pulling your arms down towards your body. Close grip pulldowns also work your biceps, forearm muscles, and your shoulders.
When you perform close grip pulldowns, your latissimus dorsi muscle contracts to pull your arms down towards your body. At the same time, your biceps and forearm muscles work to help you pull the weight down. Your shoulders also play a role in this exercise by stabilizing your arms and preventing them from moving too far forward or backward.
How to Perform Close Grip Pulldowns
To perform close grip pulldowns, you will need a cable machine with a close grip attachment. Follow these steps:
- Stand in front of the cable machine and attach the close grip bar to the cable.
- Adjust the weight on the machine and sit on the bench with your feet flat on the floor.
- Grab the close grip bar with an underhand grip, with your hands shoulder-width apart.
- Lean back slightly and pull the bar down towards your chest, keeping your elbows close to your body.
- Pause for a second at the bottom of the movement, then slowly release the bar back up to the starting position.
- Repeat for the desired number of reps.

Tips for Performing Close Grip Pulldowns
Here are some tips to help you perform close grip pulldowns correctly:
- Keep your back straight and your chest up throughout the exercise.
- Don't lean back too far or use momentum to pull the weight down.
- Squeeze your shoulder blades together at the bottom of the movement to engage your back muscles fully.
- Exhale as you pull the weight down and inhale as you release it back up.
Benefits of Close Grip Pulldowns
Close grip pulldowns offer several benefits, including:
- Strengthening your back muscles and improving your posture.
- Working your biceps and forearm muscles.
- Improving your overall upper body strength.
- Providing an alternative to traditional lat pulldowns.

Conclusion
Close grip pulldowns are an excellent exercise for strengthening your back muscles and improving your posture. By performing this exercise correctly, you can also work your biceps, forearm muscles, and shoulders. Use the tips provided in this article to perform close grip pulldowns safely and effectively, and enjoy the benefits of a stronger, healthier back.